
To The Brink is the 3rd Main Story Quest in Horizon Forbidden West (HZFW). This walkthrough will guide you through all objectives of the To The Brink main mission.
Starting Location: The Daunt
Quest Giver: Karhn (automatically triggered after initial credits)
Quest Level: Level 5
Requirement: having completed The Point of the Lance
Reward: +2500 XP, +2 Skill Points
Mission Info: To Enter the Forbidden West and track down Sylens, Aloy must first attend an Embassy on the border of the Cargo Sunday. But dangerous new machines threaten to halt the proceedings.
Objectives:
- Go to Chainscrape – Find Erend – Go to Erend’s Last Known Location
- Go to Chianscrape OR Find Erend and Go to Erend’s Last Known Location
- Go to Chainscrape – Talk to the Guards
- Upgrade Your Bow
- Find Erend – Go to Erend’s Last Known Location
- Kill the Machines Near the Oseram Trapper
- Talk to the Oseram Trapper
- Search for Erend’s Tracks
- Follow the Tracks
- Kill the Machine
- Talk to Erend
- Clear the Daunt – Go to the Source of the Explosions
- Clear the Daunt – Kill the Machines
- Clear the Daunt – Talk to the Oseram Worker
- Talk to Vuadis
- Talk to Ulvund
- Return to Vuadis
Starting Location: The Daunt


Go to Chainscrape – Find Erend – Go to Erend’s Last Known Location
Once you regain control of Aloy, start making your way through the next set of waypoints, engaging machines and collecting parts and resources as you see fit.

At some point, you’ll get to a fork in the path where the game allows you to choose which objective you want to continue with. If you go right, you’ll enter Chainscrape. If you go left, you’ll start searching for Erend. Since the game numbers “Go to Chainscrape” as 1, we’ll go to Chainscrape first.

Go to Chainscrape – Talk to the Guards
Approach the gate to be welcomed by two guards you can talk to. Once inside, we’ll be welcomed by a familiar face, Petra.

Upgrade Your Bow
Petra would like to catch up over a cold pint of beer, but we first need to upgrade our bow. So, time to look for a workbench, which is, incidentally, located right by where we regain control of Aloy. In the Workbench menu, select Weapon Upgrades, then Hunter Bow, then Upgrade on tier one. We can now craft Acid Arrows, a type of arrow that leaves enemies in a corroding state, making them more vulnerable to regular and advanced arrows.

Find Erend – Go to Erend’s Last Known Location
Now we can take care of this mission’s second objective and go look for Erend.

Exit Chainscrape through the main gate you came in from and make your way to Erend’s last known location. As usual, decide whether you want to engage machines and scavenge materials or run past them. You will eventually reach a field with some shock tripwires.
Kill the Machines Near the Oseram Trapper
An Oseram Trapper is trapped on some ruins, hiding away from some Scroungers. You can lure the machines onto the tripwires to incapacitate them or use any other way to get rid of them.


Talk to the Oseram Trapper
Now the Oseram Trapper will join you back on the ground and you can talk to him. You might want to scavenge some parts and resources before proceeding. His name is Thurlis and he’s kind enough to give us a new weapon, the Tripcaster, free of charge. You can then ask him more questions or select “I need to keep moving” to continue on. Before leaving, he will tell you about the Hunting Grounds, the same trials from Horizon Zero Dawn.

Search for Erend’s Tracks
Reach the next marker just a few meters south of where we talked to Thurlis, along the path. Once there, activate your Focus and then  to highlight tracks. The tracks start exactly where the quest marker is.

Follow the Tracks
Follow the purple tracks and silhouette and keep following them until you find Erend.
Kill the Machines
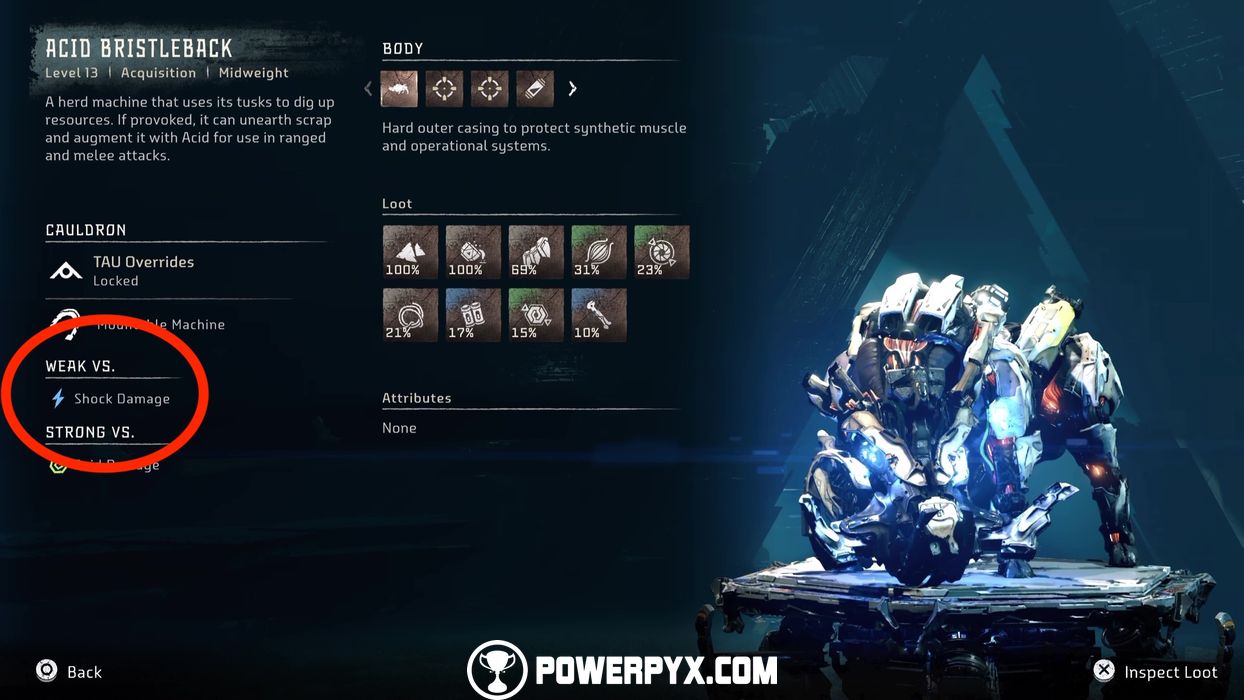
Time to kill some machines. One of them is a new machine type: Acid Bristleback which is weak to Shock Damage and strong to Acid Damage. Therefore, avoid using Acid Arrows.
Instead, while staying hidden, place some Shock Tripcasters in the area and then lure them into them with a rock throw.

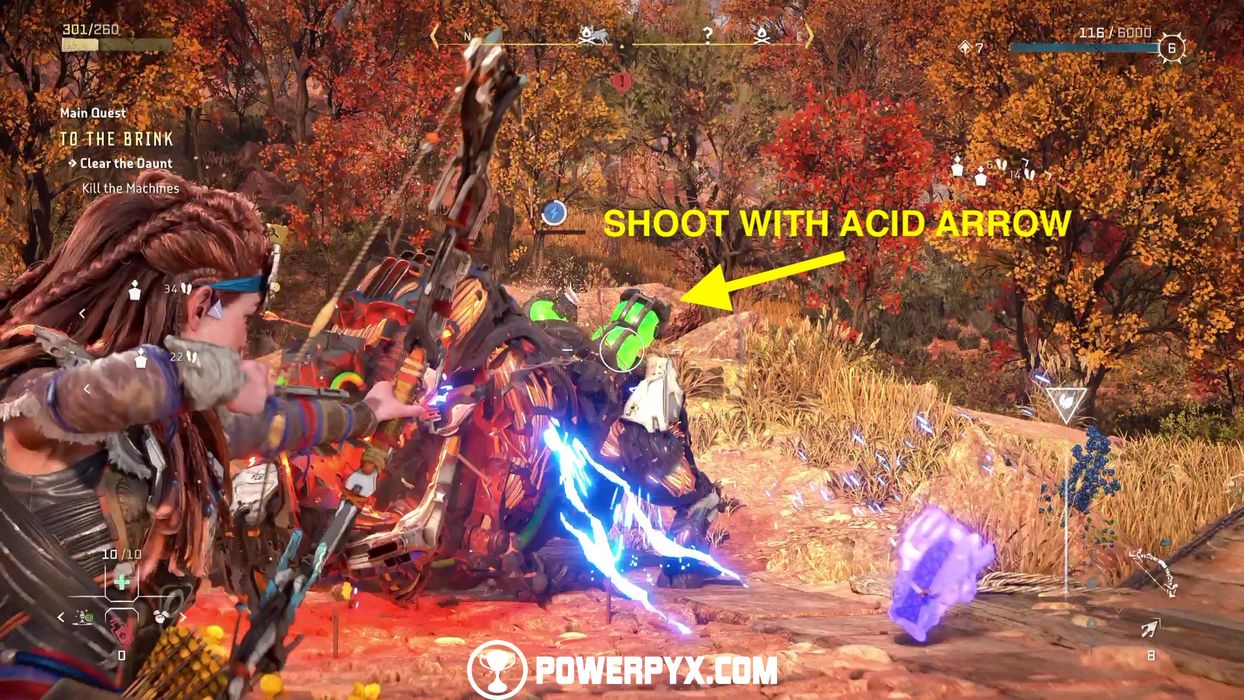
As for the Scrounger, weaken it with an Acid Arrow and then simply dispose of it with regular arrows. Alternatively, you can sneak up on it and perform a Silent Strike. Don’t forget to loot the machines when the area is clear.
Talk to Erend
Now go talk to Erend. While talking with Erend, the game introduces you to Flashpoints, emotional moments which allow you to express Aloy’s personality any way you see fit. Flashpoints don’t lock you out of trophies, so choose whichever option you like best.

Clear the Daunt – Go to the Source of the Explosions
We now need to go and examine the source of some explosions we’ve just heard. Start making your way to the main map marker.

Clear the Daunt – Kill the Machines
On your way to the source of the explosions, you’ll find other Bristlebacks. You can easily stealth-kill them by running up to them from behind and pressing (even though they have their red “alert” lights on, they will be distracted by the other people and as long as they don’t see you the stealth-kill will work). After all are defeated you can talk to an Oseram Worker called Belna.
Clear the Daunt – Talk to the Oseram Worker
Talk to Belna and choose any conversation option you like or feel free to leave it.
Talk to Vuadis
Make your way back to Studious Vuadis. You can either sprint to the marker or fast-travel to a nearby campfire.


Talk to Ulvund
Now make your way to Ulvund, who is in Chainscrape as well, in the lower section of the settlement. After talking to him you will also get the Side Quest “The Bristlebacks” (Level 7). You also gain access to merchants now, which allow you to purchase new equipment, restock your resources, and sell unneeded items. Stitchers sell protective new outfits, Hunters sell powerful new weapons, Herbalists sell valuable Potions, Cooks sell skill-boosting food.


Return to Vuadis
Get back to Vuadis to see him off.
This finishes To the Brink Main Quest in Horizon 2: Forbidden West.
For all other Side Quests and Main Quests, check out the complete Horizon Forbidden West Walkthrough.
Hype says
What’s up man how do I get erend to come to the base for the first forge quest? I have the mission and it says wait for erend to arrive at the base. I’ve went everywhere in the base and even went to where first forge is located. I’m still in main story with aether Demeter and Poseidon not completed yet.