
Toward the Nest is the 69th main mission in Crimson Desert. This walkthrough will guide you through all objectives of the Toward the Nest main quest.
- Starting Location: Demeniss region
- Chapter: 5: Guest Unbidden
- Sub-Chapter: Uninvited Guest
- Requirement: Finished previous quest Secret at the Church
- Reward: Blackwing Leather Armor (Body Armor), Blackwing Mask (Head Armor), Tauria Curved Sword (Weapon)
- Quest Description: The Spire of Soaring has been activated. It is time for the final showdown. Go to the tower and head to where the enemy awaits.
Objectives:
- Go to the Spire of Soaring
- Activate the Spire of Soaring
- Activate the Skybridge (Crescent Skybridge)
- Move to the final battleground
- Defeat Crowcaller

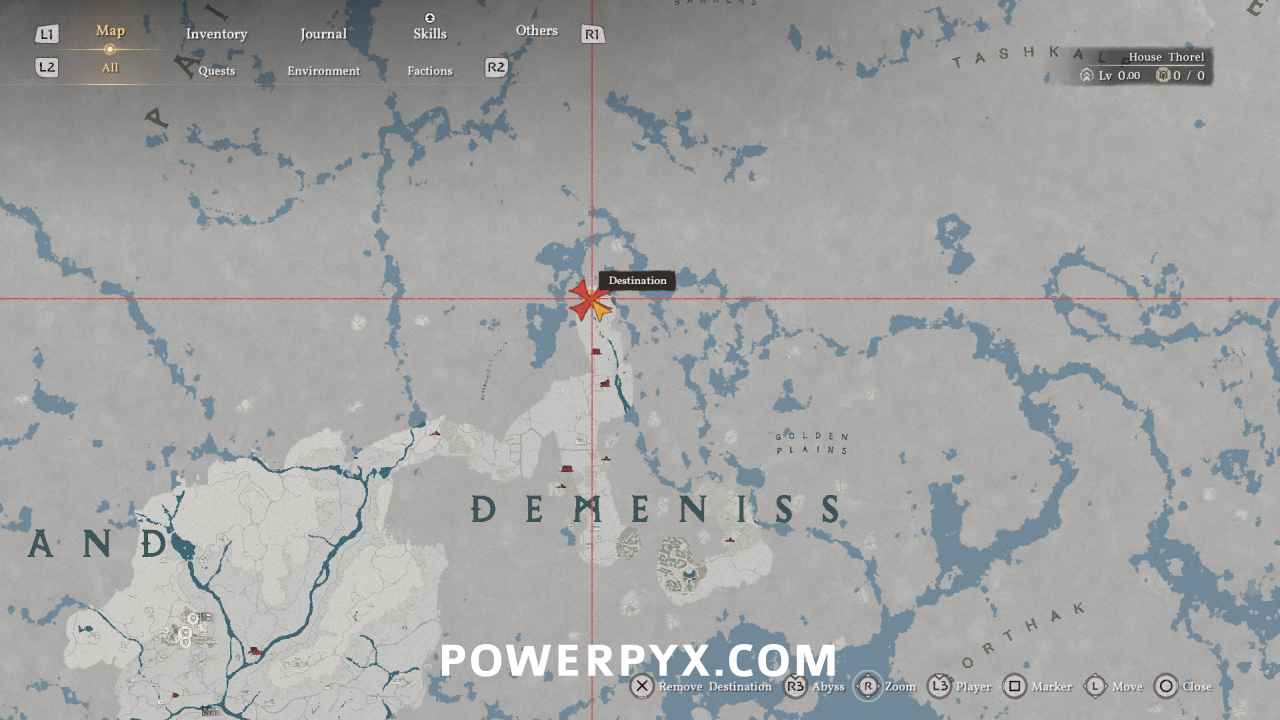
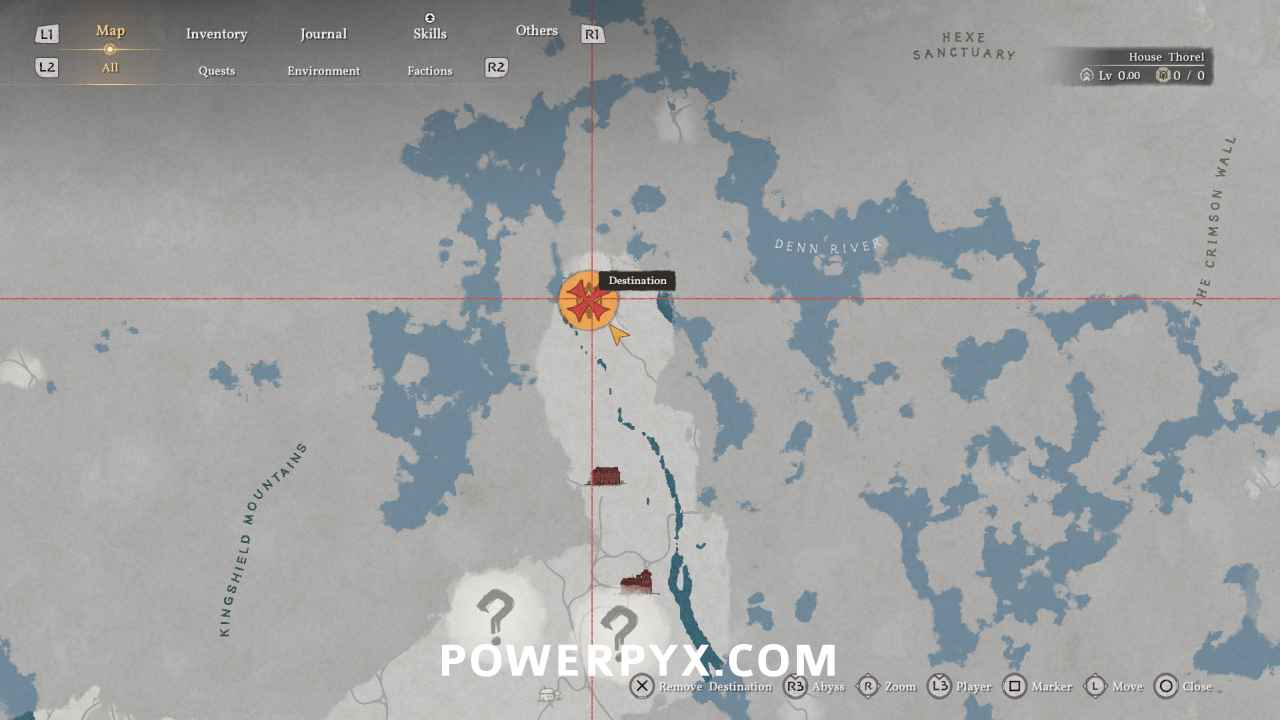
Go to the Spire of Soaring
Spire of Soaring is located in the north of Demeniss region.
Activate the Spire of Soaring
Activating Spire of Soaring requires going to the top floor and turning the wall panels to reroute the power. Then the elevator goes up and you can turn the big wall plate to reroute power one more time, which will lift the elevator to the Abyss in the sky.
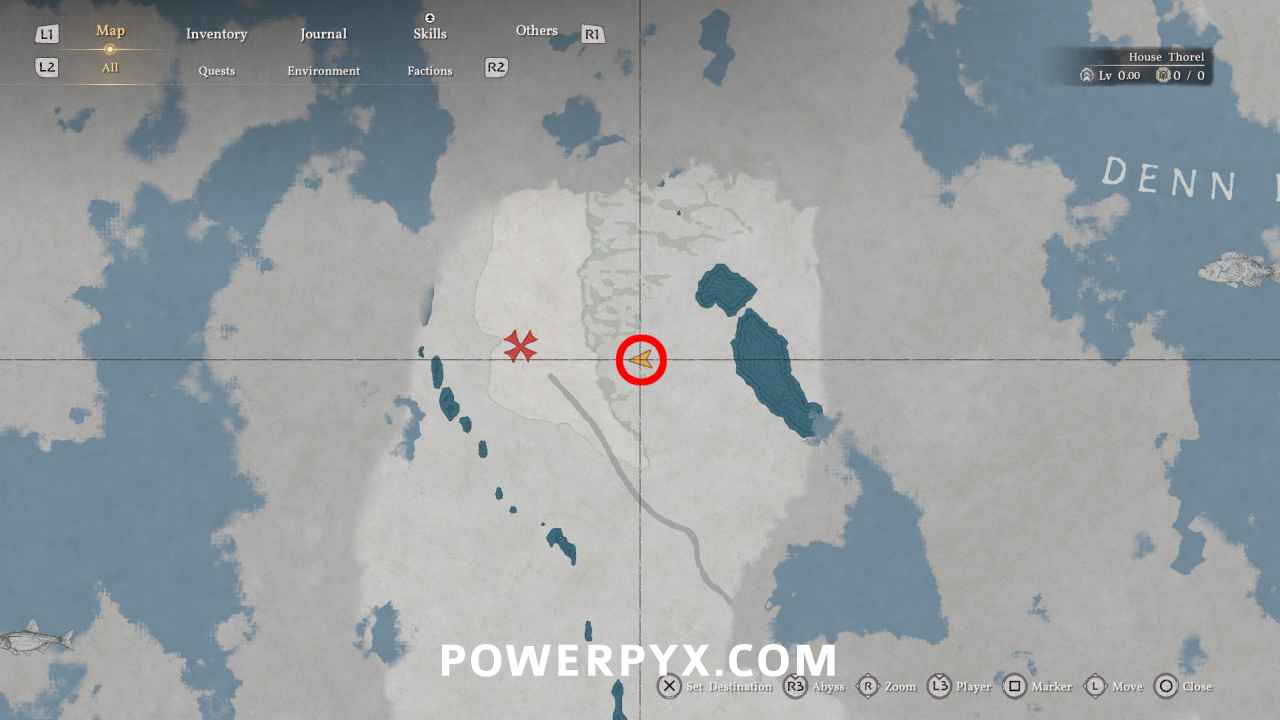
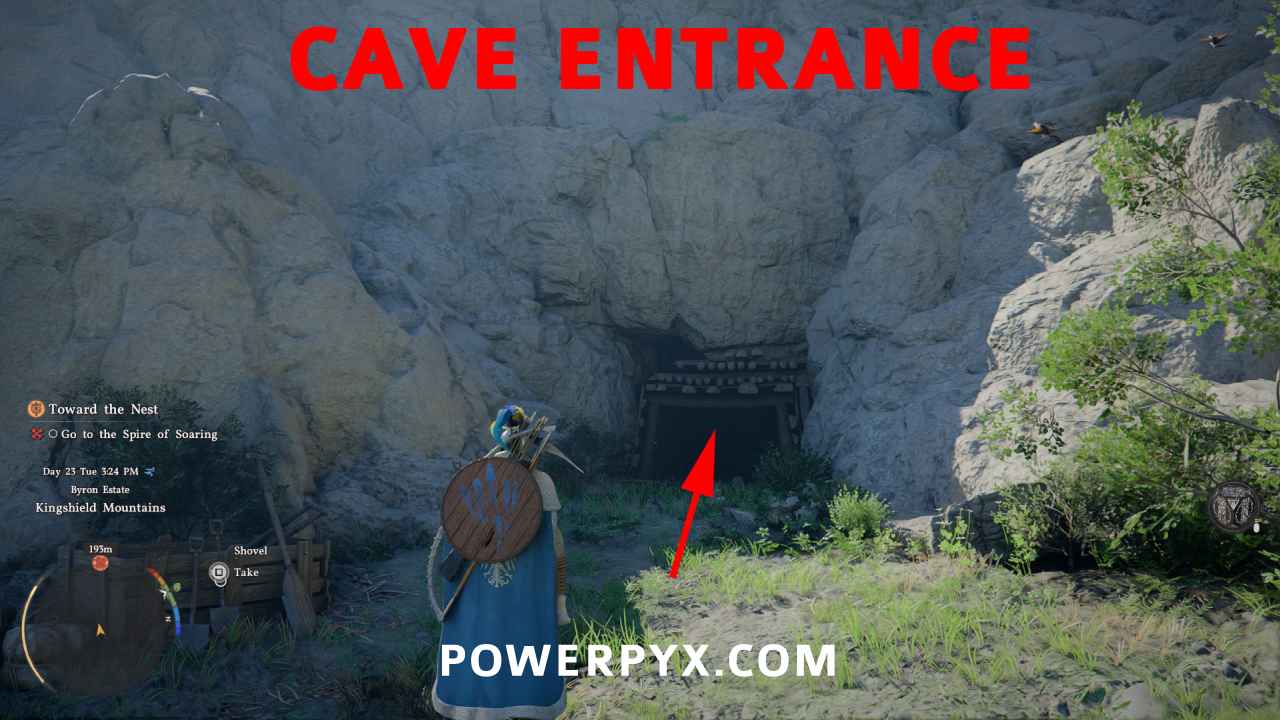
Step 1: To enter the Spire of Soaring, drop down the cliffs to the right in front of the tower and enter the cave. It leads inside the tower to the basement.
Step 2: Jump and glide over the blue wind platform (double press  ). The wind will catapult you up to the top floor until you hit a platform that blocks the way. Land next to the platform on the top floor where the wind stops.
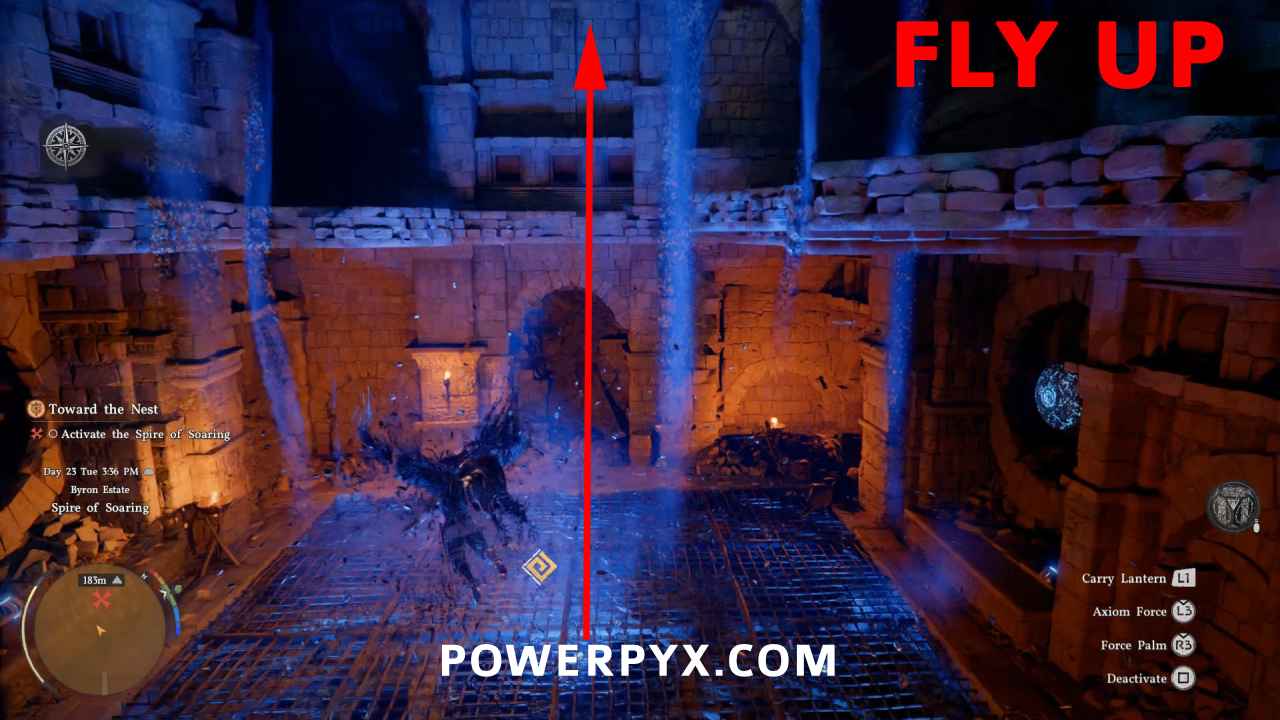
Note: DON’T take out the two blue balls on the wall of the basement. They power the wind turbine. Also DON’T take out the battery on the wall below the top floor, it’s needed to power the wall panel on the top floor.
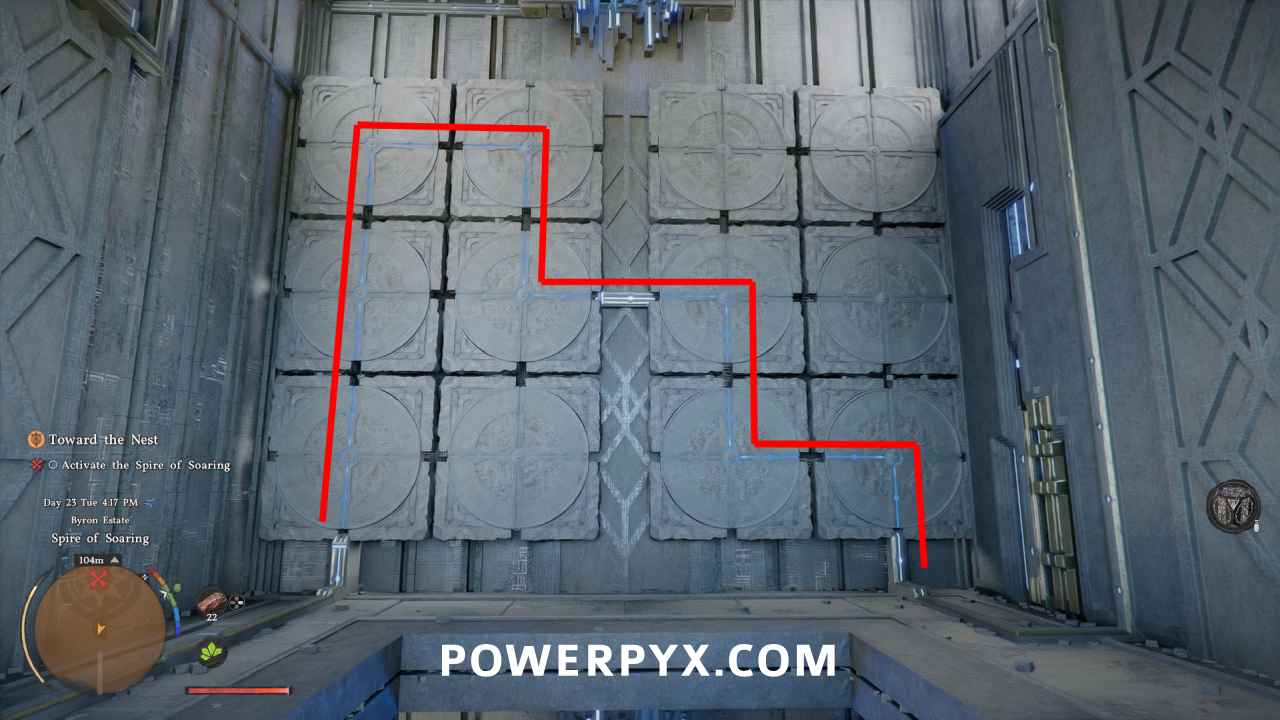
Step 3: On the top floor you must reroute the power. Don’t interact with the battery in the wall below, it’s already correctly placed and brings power to the top floor. The power must flow from the left wall (where a blue line enters the wall) to the right wall. Hold  +
+  to see the power lines hidden inside the wall panels. Grab the wall panels with Axiom Force by holding
  and push the right stick to rotate the panels. Start with the bottom left wall panel and end with the bottom right wall panel.
Rotate all Wall Panels so they look like this:
Step 4: The platform in the middle will now lift up to the next floor. Fly in the air stream again to get up there. Stand on the platform and you’ll see a big round wall panel with blue glyphs in the middle. You must spin this twice in any direction to align the power lines to left-bottom-right. Hold and rotate the right stick. The correct position looks like this:

Step 5: Stand on the platform and let it lift you to the top of the tower. On the top floor it stops for a few seconds until the roof opens. Just stay still on the platform, it will continue to fly up into the sky. The whole platform ride takes like 2 minutes. Stay on the platform until you reach the abyss in the sky, enjoy the view.
Activate the Skybridge
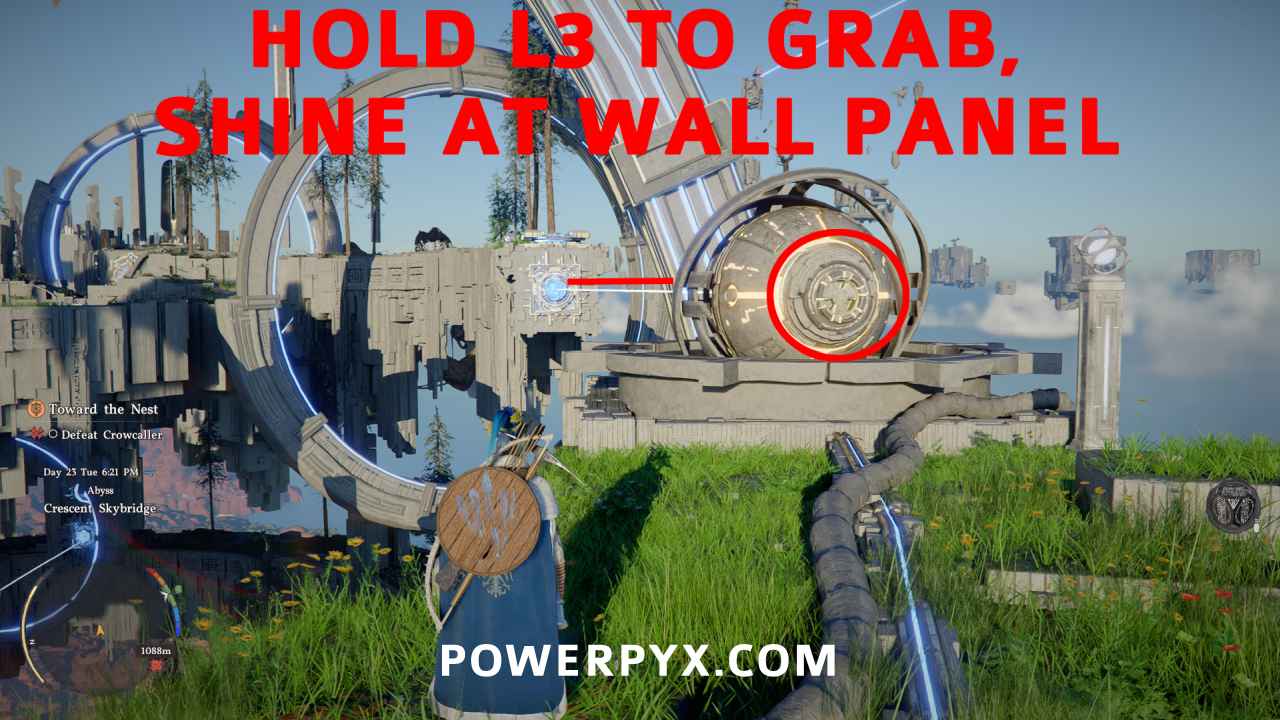
Activating the Skybridge requires shining all lights from the round orbs at the wall panels, then repair two broken cables on the other side. This makes the power flow to the wall at the end, punch it once with Force Palm (  ). Then the Skybridge can be activated. You can press + to see the power cables, active ones are colored blue and inactive cables are yellow. The two broken cables are yellow until you reconnect them.
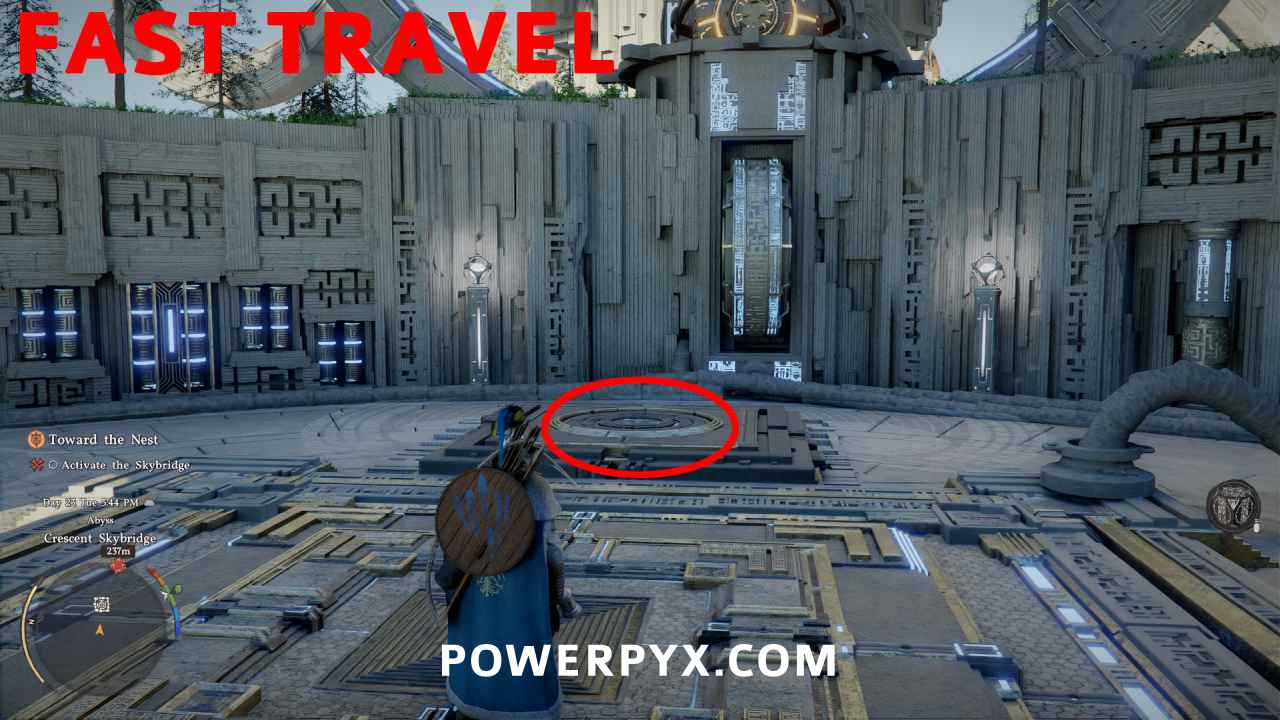
Step 1 (Optional): As soon as the elevator platform stops, step on the round floor plate in front of you to activate the fast travel point. If you fall down you can fast travel back here by pressing on the map. However, if you fall it will reset the puzzle so must repeat all steps from here on.
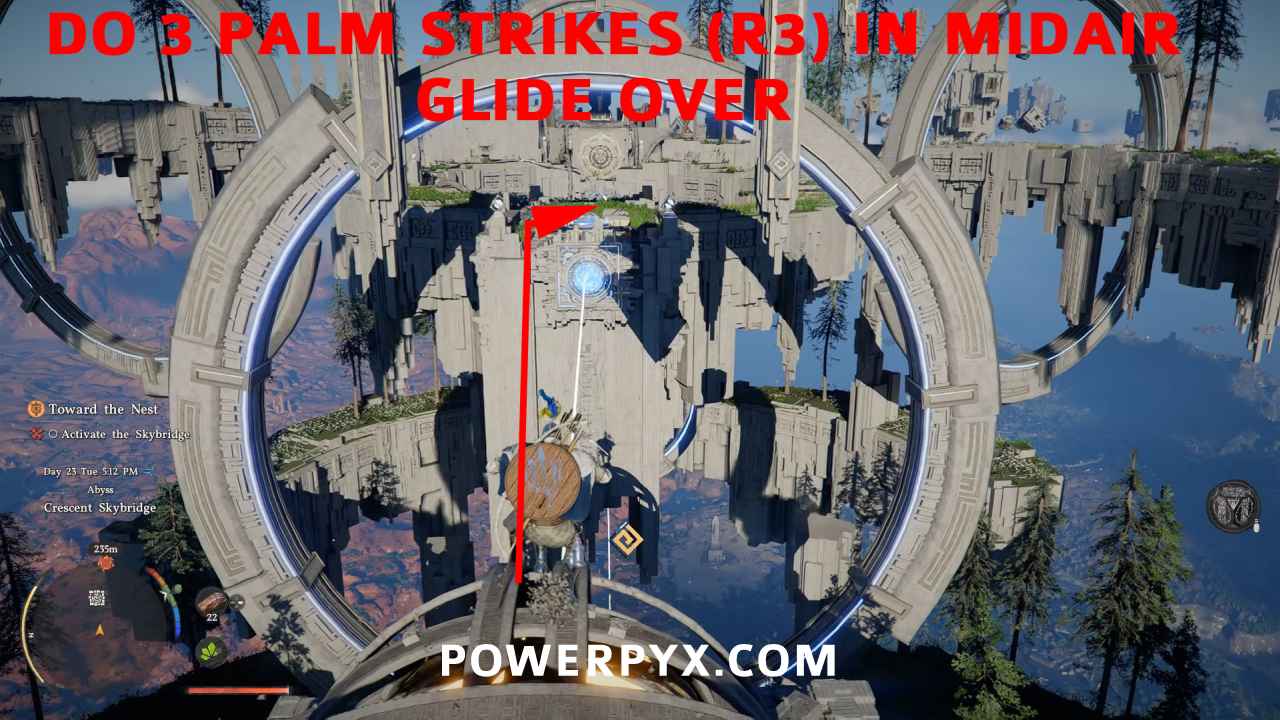
Step 2: Ignore the big orb in front you, it already shines at the wall panel. Instead, go to the right of the orb and jump up the platforms where you see other orbs with light beams at the top of the area. You can easily reach the top by doing 3 Force Palm attacks in midair to boost yourself up (jump and press 3 times).
At the top, use Axiom Force (hold ) on the right Orb and aim the light at the wall panel.
Do the same for the leftmost orb and shine it at the left wall panel. Be careful of the purple flowers on the path, they damage your health.
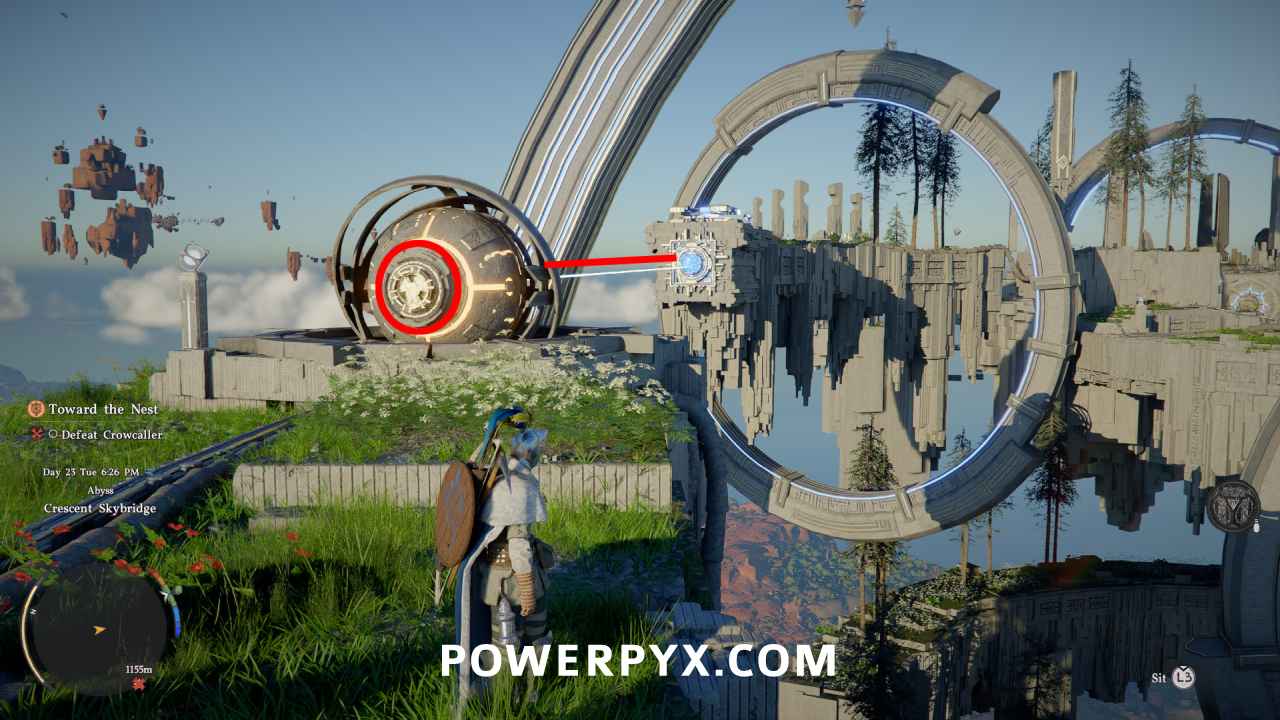
When done correctly, all of the big rings will turn blue and start rotating. The two middle Orbs (the one at the bottom and the top) don’t need to be interacted with. They already shine at the correct wall panels. If you accidentally interacted with them and pointed them somewhere else, you’ll have to repoint them at the wall panels that turn blue. So in total all 4 orbs must shine their line at 4 wall panels that turn blue.
Step 3: From the middle Orb at the top, jump over to the other side through the rotating rings. You do this by jumping and using 3x Force Palm with in midair, then press /  to glide over.
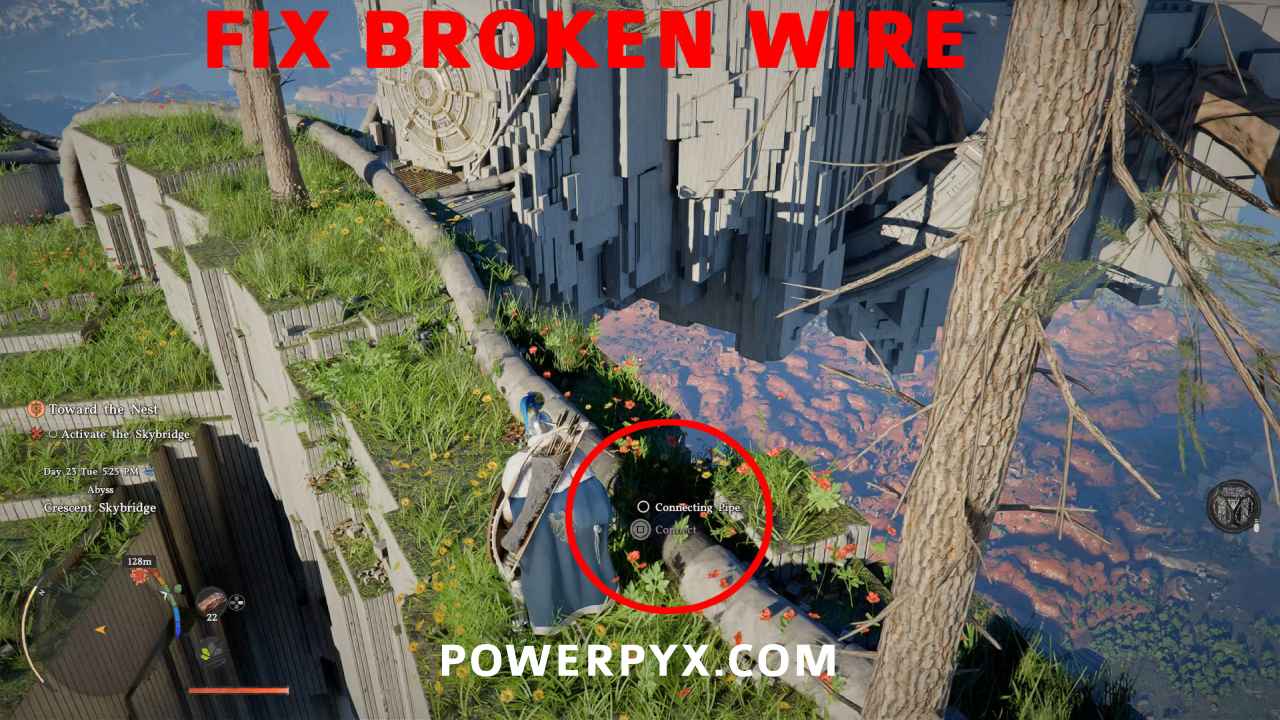
On this side you must fix two broken power cables. Hold + to follow the power cables with a yellow glow, those are the broken ones. Follow them until you find the broken section and reconnect it by holding / .
One broken cable is in the middle.

The other broken cable is on the far right.
When done correctly, you get a cutscene where the round wall panel at the end gets activated.
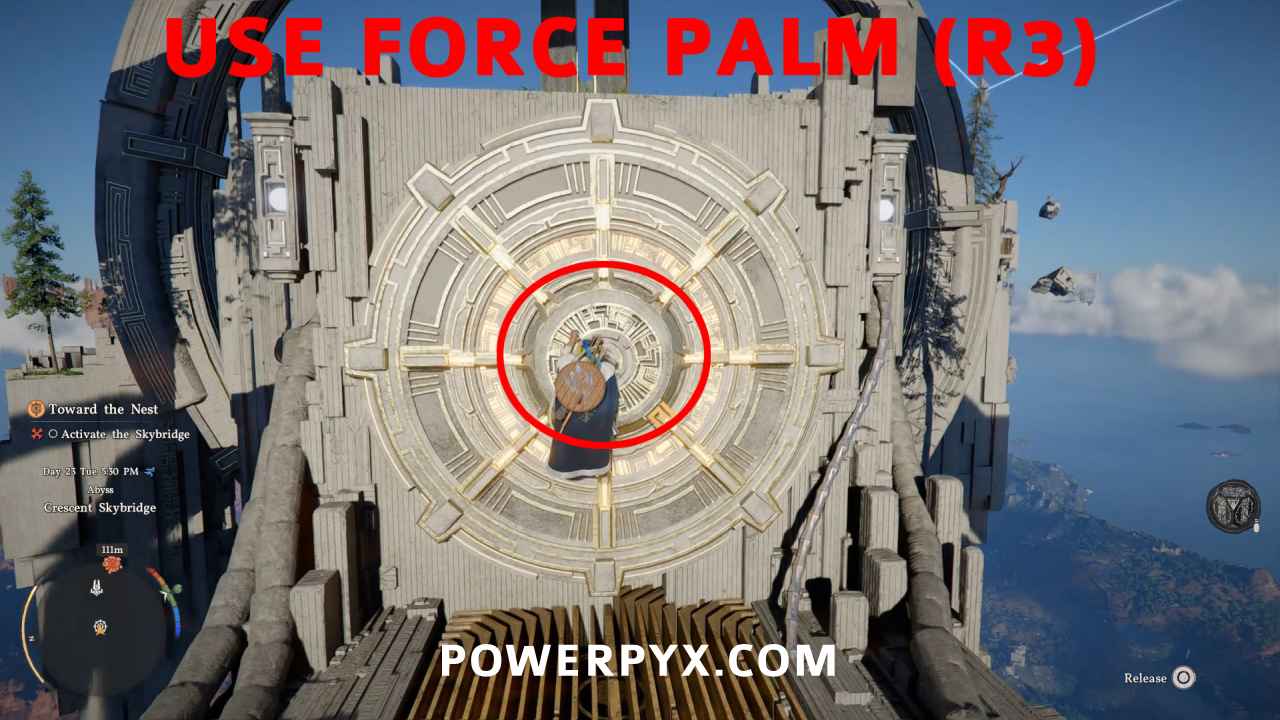
Step 4: Climb to the middle of the round wall panel at the end and hit it with Force Palm ( ) while hanging to the middle of it. This will give another cutscene where the Skybridge gets powered on.
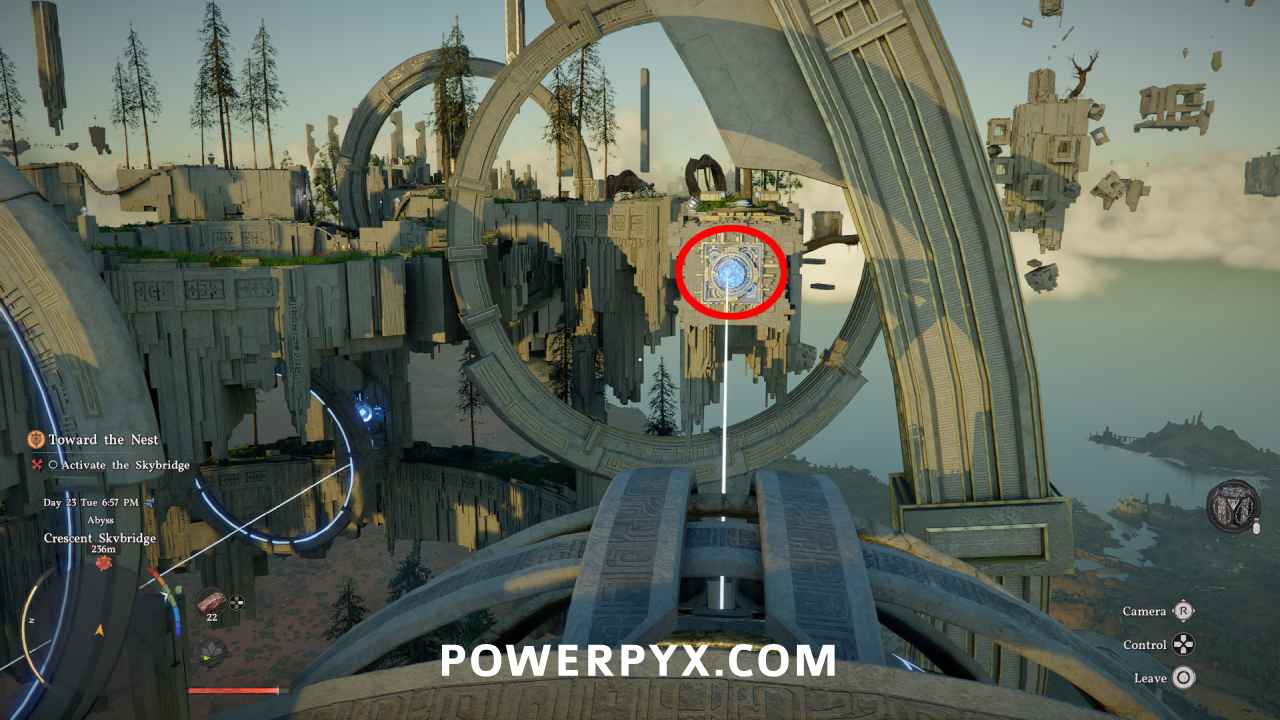
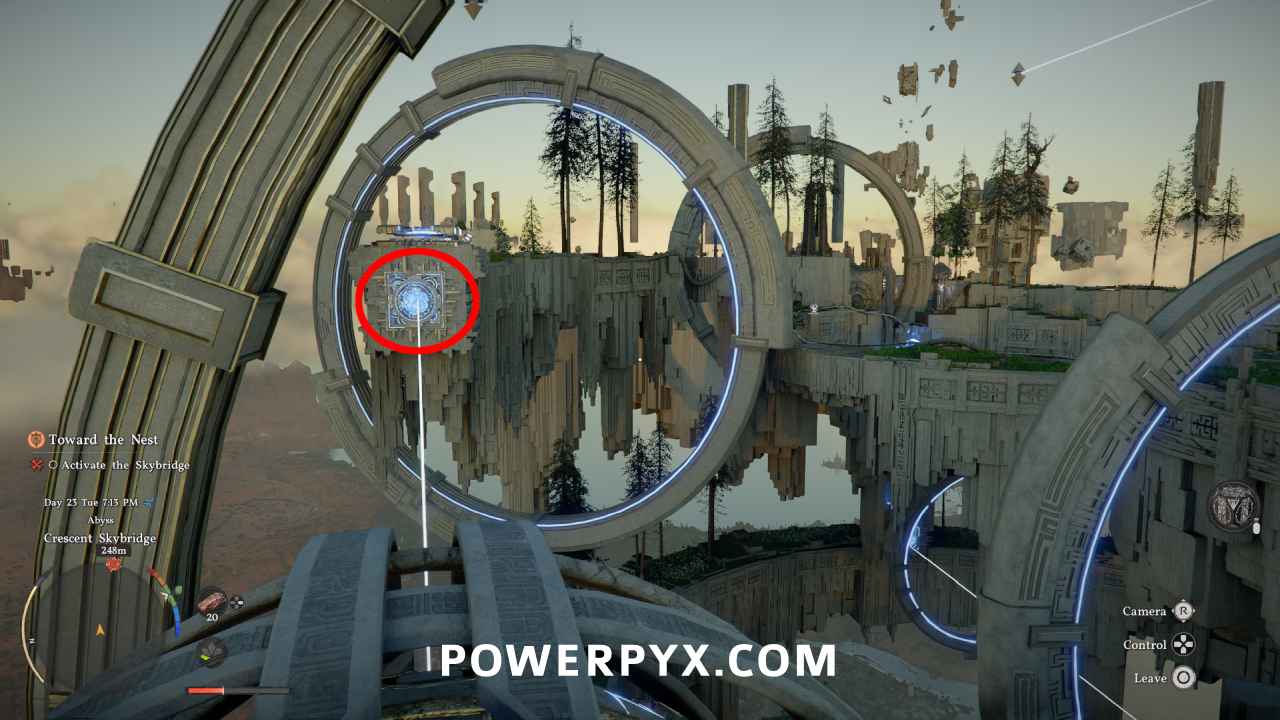
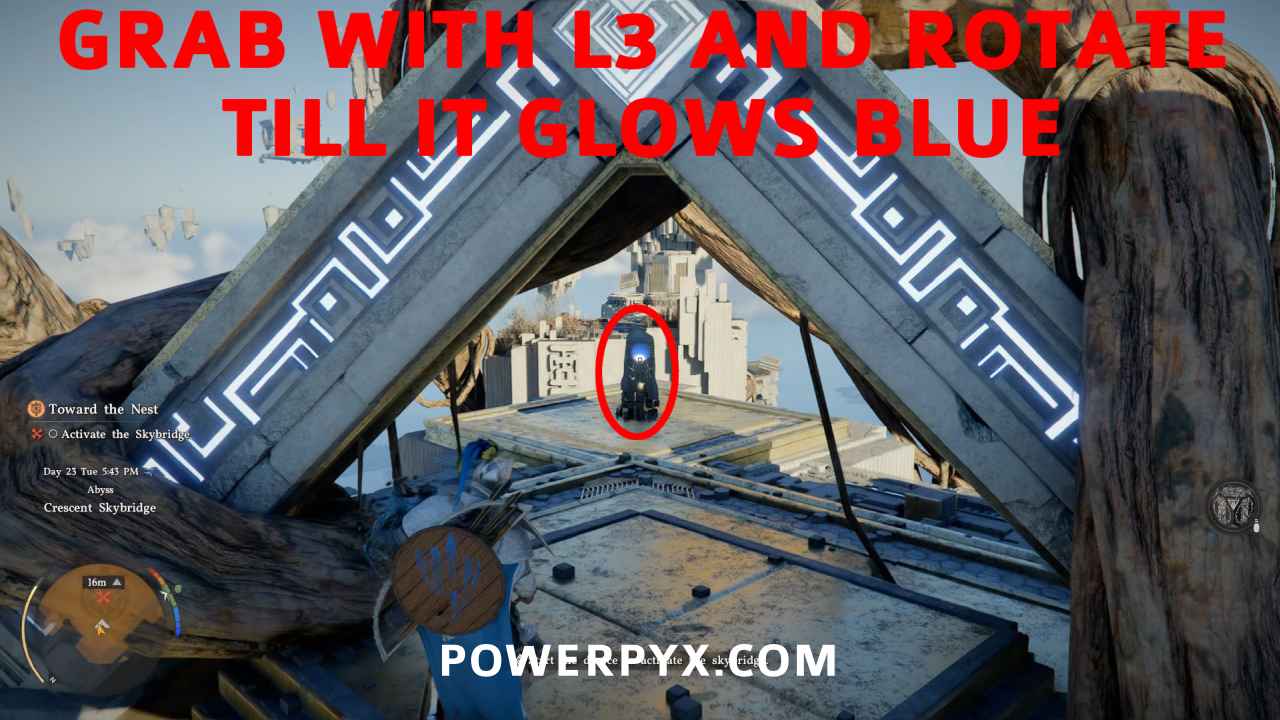
Step 5: Climb up the wall panel and head toward the objective marker on the minimap. Step through the Skybridge and a pillar will come out of the ground. Use Axiom Force on it (hold ) and then turn it with  /
/  until it glows blue. Stop turning it when it’s glowing blue and wait a few seconds. Then the Skybridge gets activated.
Move to the final battleground
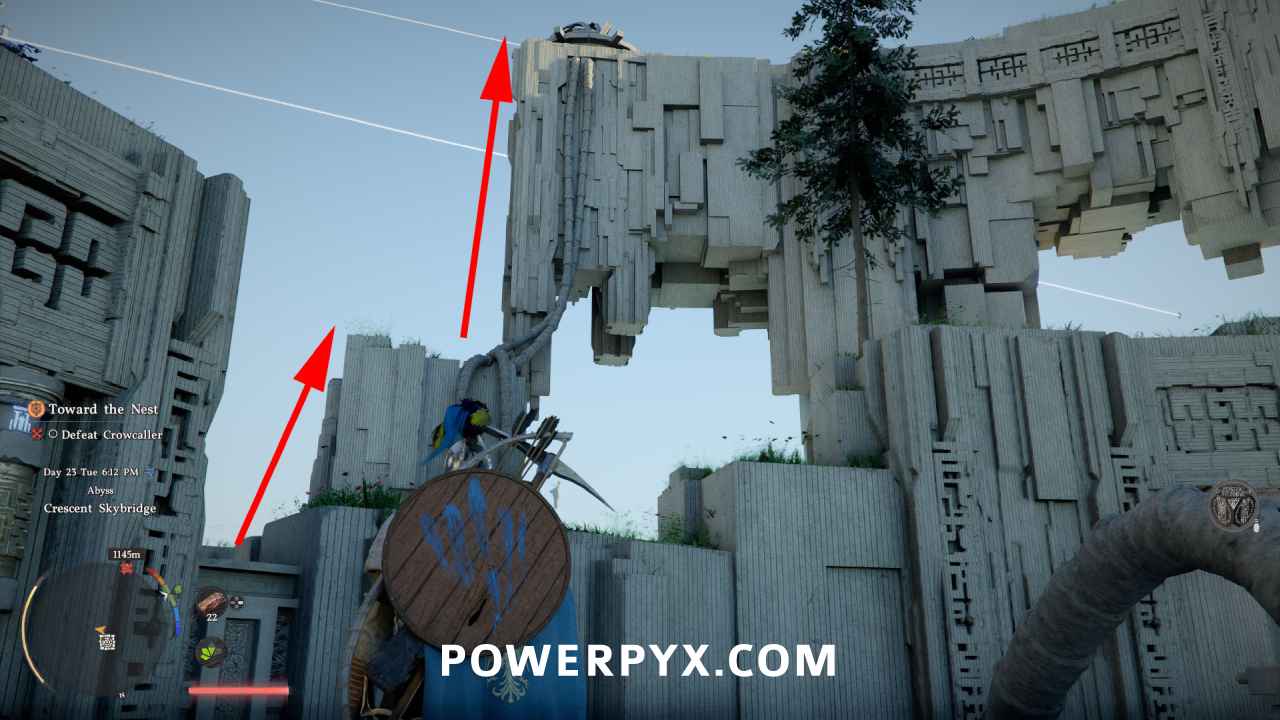
Follow the platforms that appear behind the activated skybridge. Fly over the wind turbines to be catapulted up the platforms. Then stand in the blue ground platform at the top to be teleported to the final battleground. Just climb up the platforms there until you see a tree. Before approaching the tree, activate the fast travel point (floor plate). Then go toward the tree to get a cutscene, you get ambushed by enemies. Defeat them and the Crowcaller boss will appear.
Defeat Crowcaller
Crowcaller Boss has 3 full healthbars. Each phase he gets more aggressive. The best strategy is to counter his attacks with , then land a quick attack combo, rinse and repeat. Keep healing the entire time with . It’s highly recommended to bring lots of food. You can fast travel back to Hernand town and buy lots of meat from the meat vendor, use the cooking pot next to the meat vendor to cook lots of Grilled Meat. Bring 100+ of these and you’ll be able to brute force the boss by constantly healing yourself. If the meat vendor runs out of meat, you can wait till the next day for her inventory to refill (rest at a campfire to skip time and stand around).
As long as you have enough healing items and have upgraded your gear at the blacksmith, you can brute force the boss with countering and continuous healing.
Beating the Crowcaller Boss finishes Toward the Nest in Crimson Desert.
For all other Quests refer to Crimson Desert Walkthrough.
Hocine says
This boss is a mess only because the game is running at 15fps on PS5. The crows around him explain that… Even with the performance mode
Alex B says
The biggest problem with this game is that whenever I get frustrated by a puzzle, and go to look up the solution, it’s usually “well how the hell was I supposed to know about that”. I got this by myself all the way up to shooting all the lasers at the appropriate spots. But then I had to look up the broken cables.
Alex B says
Furthermore, just as another example. I found some ancient ruins where there were some blocks under ice/water that I figured out how to expose them. It was obvious they needed to be reconfigured to match a pattern. But then, I had no way to move the blocks. Axiom force didn’t work. I could find no way.
Finally I had to look it up. Apparently I was supposed to just know I could do the “stab” move to lodge my sword in the blocks and then drag them. That mechanic is never explained or revealed.
This game is one frustratingly large problem short of greatness.