PowerPyx.com

PowerPyx

  • Trophy Guides
  • Game Guides
  • Wikis
  • Trophy Lists
  • Next Guides
  • Contact
Show SearchHide Search
Home » Game Guides » Crimson Desert » Crimson Desert Dance with the Devil Walkthrough

Crimson Desert Dance with the Devil Walkthrough

March 18, 2026 by imbroken963 Leave a Comment

Dance with the Devil is the 40th main mission in Crimson Desert. This walkthrough will guide you through all objectives of the Dance with the Devil main quest.

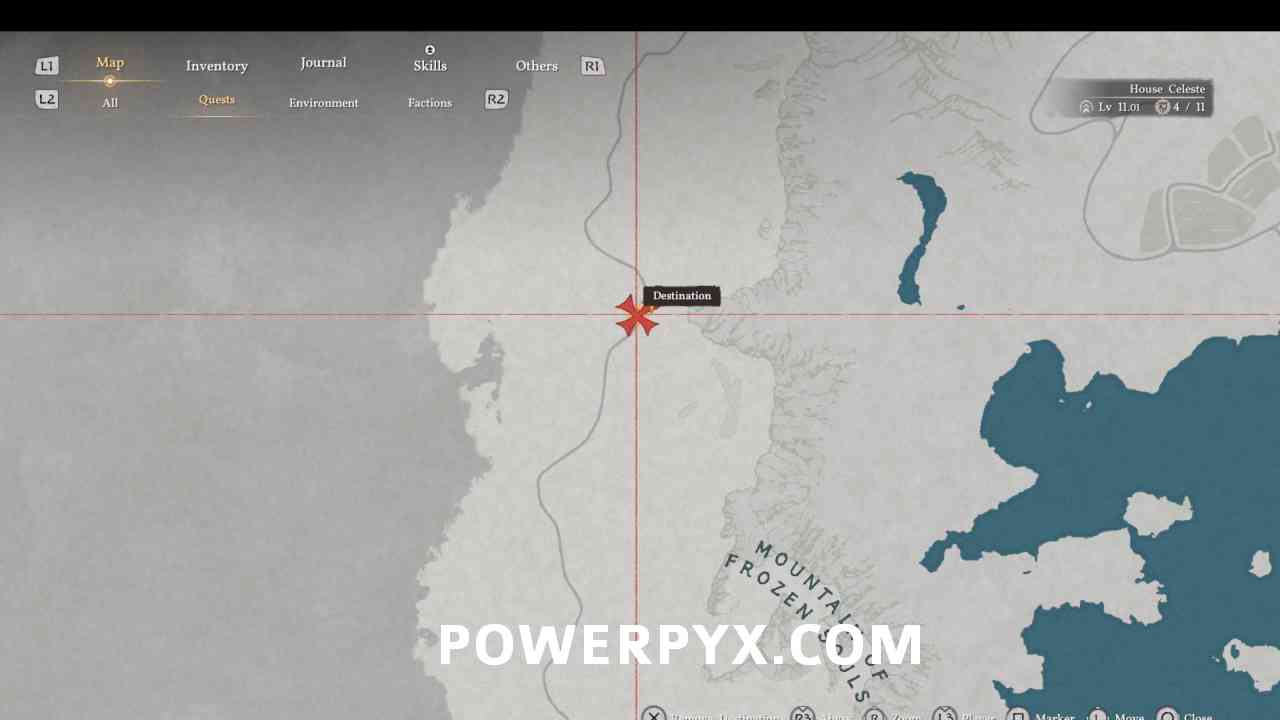
  • Starting Location: Hernand region > Mountain of Frozen Souls
  • Chapter: 3 – Howling Hill
  • Sub-Chapter: The Face Behind the Mask
  • Requirement: Finished previous main quest Seed of Unease
  • Reward: Sunset Reed Cloth Gloves
  • Quest Description: A chilling wind carrying the scent of blood blows through the reed field. He is close. Defeat the devil that threatens the Greymanes.

Objectives:

  1. Defeat the Devil of the Reed Field

Defeat the Devil of the Reed Field

Before attempting this fight it is wise to load up on as much cooked meat as you can find. Each night at 0:00 the Butchery gets more meat and poultry. Spend a couple day/night cycles in the game stocking up on meats to cook before this fight:
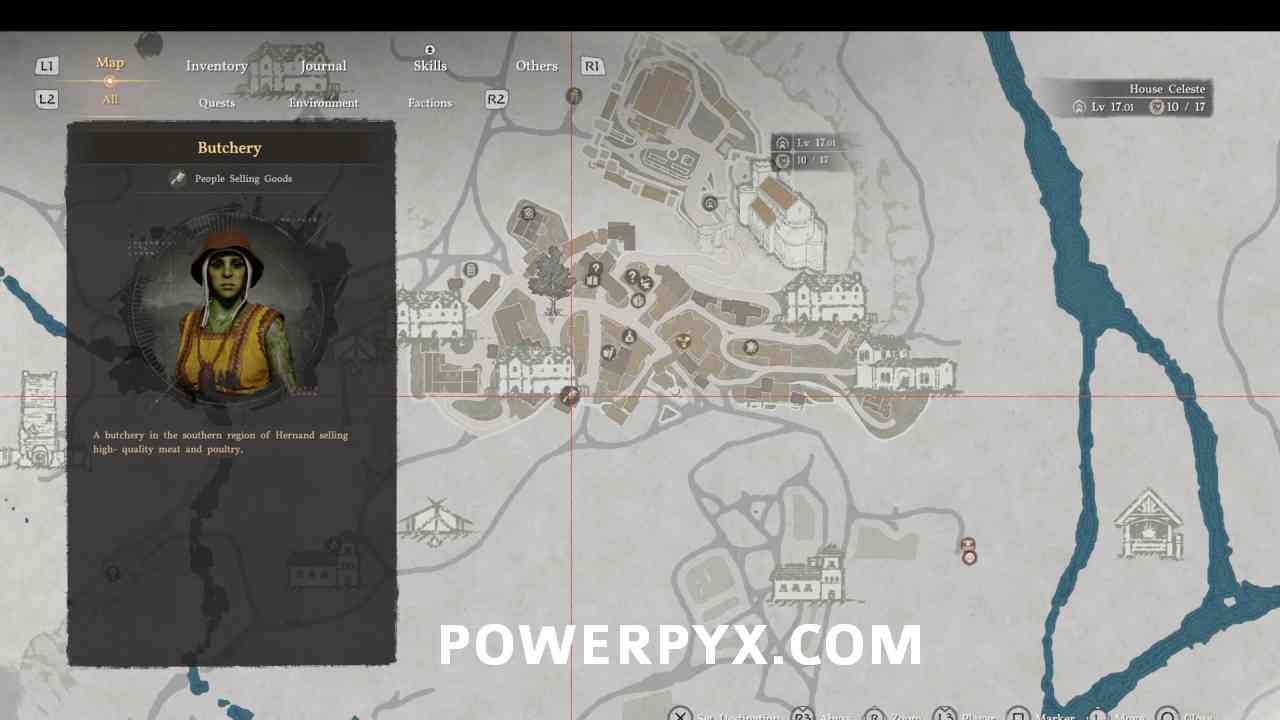
If you are really good at the game you may only need a handful of meat but unless you have already gotten the hang of parrying you may need up to 100 Grilled Meats. You can also run through the woods and hunt/skin animals for meat. Especially groups of deer tend to give 3-4 meat per deer.

Take some time to farm some materials to upgrade your armor so you aren’t defeated in a single combo if your armor isn’t upgraded much as this is the first boss with difficulty behind it. Buy the plate armor from the merchant in the middle of Hernand town, and upgrade it at the blacksmith using ores.

Once you are ready for the fight head into the highlighted area with the Mission Marker:
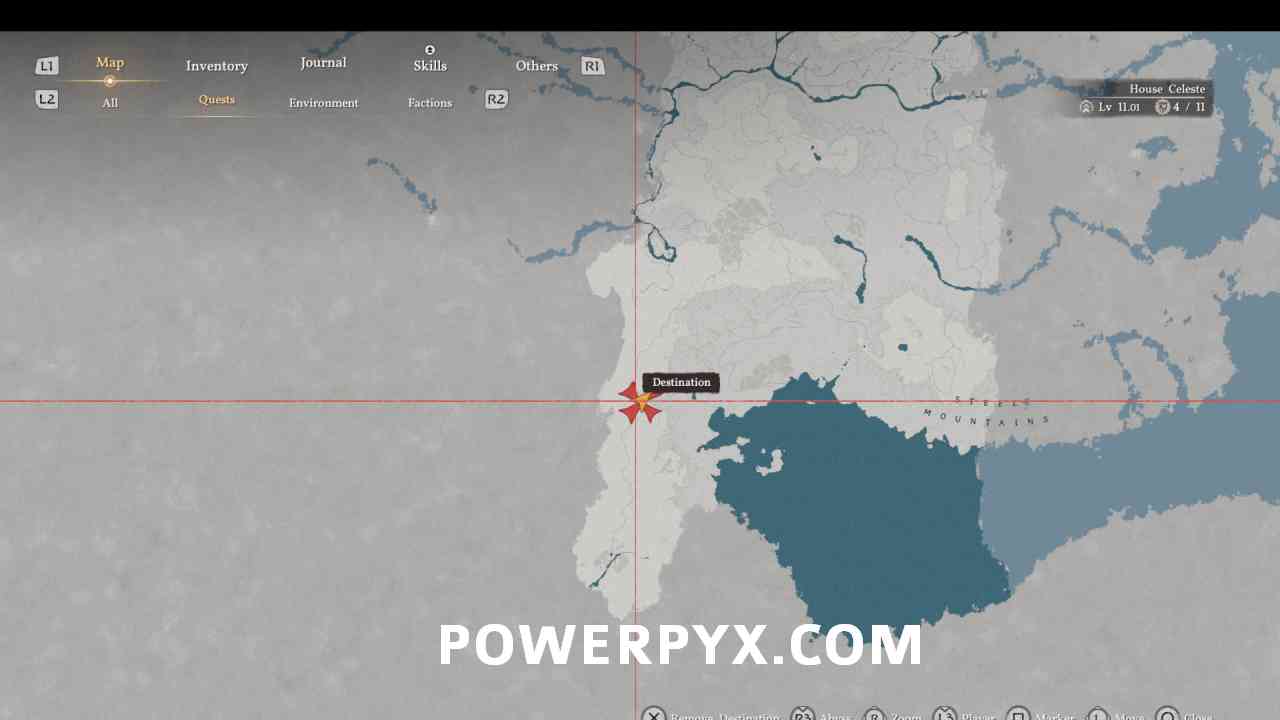
 

This will be a 3 phase fight with different strategies.

Phase #1 – One on One

For this phase of the fight try to learn all the moves the Devil does. There are only a couple of different techniques that Devil uses and they can all be parried except the move where the Devil winds up an attack and lunges forward slashing. This technique needs to be dodged. Once you have an idea what his moves are you will have to parry them by pressing :l1: / :lb: while moving the Left Stick toward the Devil. A successful party will build up the gauge below Devil’s health bar. It will also momentarily stagger him leaving him open for you to land combos.

Note that when Devil gets more aggressive the window may not stay open for 3 hits. Using light attacks doesn’t consume any stamina. You can select the Grilled Meat by holding :right: and then a single tap of :right: will heal you. You can heal WHILE attacking with light attacks and while performing other actions. Continue repeating the process until the stamina bar under the health bar is filled and any attacks will break his guard leaving him open for 2 to 3 combos.

Repeat this process until you have completely depleted Devil’s health.

Phase 2 – Scarecrows

This phase will spawn 5 Scarecrows in the battlefield. These Scarecrows will be marked on the mini-map with a small orange dot. Along with the Scarecrows the Devil will spawn 4 clones of itself all equipped with the same move set.

You will need to navigate the arena and destroy all 5 of the Scarecrows that were spawned by attacking them until they are destroyed. Be careful and keep an eye on your health bar as all 5 Devils will attack you at the same time. Dodge is going to be your best friend here. Wait for openings in the attacks to pull off a combo on the Scarecrows. Heal when you take a hit as 2 or 3 Devils attacking at the same time will be enough to defeat you from high health.

Once you defeat all 5 Scarecrows 3 of the Devils will disappear. Simply do damage to the remaining Devil to initiate phase 3.

Phase 3 – One on Two

From here on out you will be fighting Devil as you did in Phase 1 with a couple of differences. The main difference is that a second Devil will randomly appear after certain combos and keep the flurry of attack up making it harder to heal and conserve stamina. The other difference is another new move where Devil will attack with several energy waves that are red and travel in a straight line toward you. These will need to be evaded by rolling away to the left or right. These will come in a grouping one after the other until Devil sheathes his sword.

The offense is a little different because of how aggressive he is and how the second Devil can appear at any time. Do the same parry techniques as you did in Phase 1. Work the stamina bar up and break his stamina to get a good set of combos through.

Once you have depleted the health bar again the fight will be over with you victorious.

This finishes Dance with the Devil in Crimson Desert.

For all other Quests refer to Crimson Desert Walkthrough.

« PrevCrimson Desert Seed of Unease WalkthroughNext »Crimson Desert Hope After the Draught Walkthrough
Share
Tweet
Shares 0

Filed Under: Crimson Desert, Game Guides

Leave a Reply Cancel reply

Your email address will not be published. Required fields are marked *

Youtube 1,220,000Subscriber
Facebook 15,000Fans
Twitter 19,700Followers

Latest Trophy Guides

Forza Horizon 6 Achievement Guide

Mixtape Trophy Guide

NTE Trophy Guide

Saros Trophy Guide

Pragmata Trophy Guide

Mouse P.I. For Hire Trophy Guide

Crimson Desert Trophy Guide

Resident Evil Requiem Trophy Guide

Ghost of Yotei Trophy Guide

Kingdom Come Deliverance 2 Trophy Guide

Red Dead Redemption 2 Trophy Guide

Latest Game Wikis

Crimson Desert Wiki

Resident Evil Requiem Wiki

Ghost of Yotei Wiki

Borderlands 4 Wiki

Kingdom Come Deliverance 2 Wiki

Elden Ring Wiki

Hogwarts Legacy Wiki

God of War Ragnarok Wiki

Cyberpunk 2077 Wiki

Red Dead Redemption 2 Wiki

Recent Posts

  • Forza Horizon 6 Achievement Guide & Roadmap
  • Forza Horizon 6 All Barn Find Locations
  • Forza Horizon 6 All Collectible Locations (Treasure Map) – Mascots, Bonus Boards
  • Forza Horizon 6 All Treasure Car Locations
  • Mixtape Trophy Guide & Roadmap

Crimson Desert Wiki

  • Wiki
  • Walkthrough
    • Unfamiliar Lands
    • In Ashes
    • Realm of Uncertainty
    • New Journey
    • Where Rumors Gather
    • Mysterious Man
    • True Wisdom in Kindness
    • Actions Speak Louder than Words
    • Heart Beyond Borders
    • Mystical Key
    • Polar Opposites
    • Abyss Without Balance
    • Woman in White
    • Where the Light Leads
    • Memory Fragment
    • Reunion
    • For Honor
    • Awestruck
    • Shadow Cast Over the River
    • Where Misery Gathers
    • Trial After Trial
    • The Man Trapped in the Mire
    • Missing Companion
    • Secrets Hidden in the Dark
    • The Dark Veil
    • The Flames of Greed
    • Kidnapped Healer
    • Rebellion or Revolution
    • Cheers Echoing From the Edge
    • Old Friend
    • First Step to Rebuilding
    • A Fresh Start
    • Reward for Their Sweat
    • Return of the Comrade
    • Familiar Curses
    • Return
    • Traces in the Manor
    • Nonhuman
    • Seed of Unease
    • Dance with the Devil
    • Hope After the Draught
    • Scattered Comrades
    • Rumors from the Sawmill
    • A Gentle Touch
    • Bustling Hill
    • Greymanes Reunited
    • Kilnden Workshop
    • Kiln Repair at the Kilnden Workshop
    • The Mysterious Pot
    • The Iron Pot’s Usage
    • Disturbance at the Arena
    • Skilled in Archery
    • The Words of Alustin
    • Scholastone
    • On the Right Path
    • Gate to the Otherworld
    • Spire of the Stars
    • Obsession and Madness
    • Casted Shadow
    • Double-sided Invitation
    • Unwelcomed Guests
    • Demenissian Delegation
    • Exposed Plot
    • The Missing Seal
    • Crowcaller
    • The Crow’s Warning
    • Bloodwind
    • Secret at the Church
    • Toward the Nest (Spire of Soaring)
    • News
    • To the Battlefield
    • The Counterattack
    • Cradle of Defense
    • The Touch of Deliverance
    • Fire on the Frontlines
    • Fire Support
    • In Ashes
    • Hidden Fangs
    • Reclamation
    • A Thousand Troops
    • Traitor
    • All Quiet on the Front
    • News of Victory
    • Return Home
    • Ashes of Treachery
    • Trust Lost
    • Bared Fang
    • Rekindled Hope
    • Podium of Resolve
    • Shadows Over Pailune
    • Driving out the Shadows
    • Lurking Wolves
    • Reclamation
    • Lonely Jackals
    • Resolution
    • The Counterattack
    • Unleashed Fury
    • The Final Bridge
    • Broken Claws
    • Battle at Silverwolf Mountain
    • Incomplete Victory
    • Ludvig’s Whereabouts
    • Time to Face Justice
    • Healing Pailune
    • A Bond
    • Ritual Preparations
    • Where the Wind Guides You
    • Chasing a Shadow
    • Blazing Fire
    • Whispering Shadows
    • Bloodied Invitation
    • Resolve Amidst a Storm
    • Preparations for Advance
    • Rebel Suppression
    • The Cursed Knight
    • The Blood Coronation
    • Clue
    • A Fleeting Dream
    • An Unknown Voice
    • Cloister of Enlightenment
    • Mark of the Scar
    • Shackles of Fate
    • Crossing Point
    • Unwavering Steps
    • Morning Fog
    • Jijeong Temple in Chaos
    • Path to Enlightenment
    • Path of the Disciple
    • True Strength
    • Face the Inner Self
    • Fragments of Darkness
    • Pursuit Beyond the Veil
    • Black Witch
    • The Cloister of Enlightenment
    • The Sage of the Desert
    • New Perspectives
    • Lust for Power
    • Untouchable
    • The Gate of War
    • Master of the Ironworks
    • Hidden Ace
    • Clockwork Insect Clash
    • Beating Heart
    • Invaders from the East
    • Frozen Hearted Predator
    • Lingering Shadow
    • The City of Steel
    • Crossroads
    • Strange Manor
    • Fortress Keys
    • Truth and Lies
    • Master of a Forgotten Land
    • Whispers in the Wind
    • Cloud Fortress Orbian
    • Precise Execution
    • Deferred Advance
    • Departure of the Brave
    • Forbidden Gate
    • A Shadow in the Void
    • Blinding Darkness
    • A New Beginning
    • Peace in Hernand
    • The Unyielding Shields
    • The Heart of Pywel
    • The Enduring Flame
    • Evolving City
    • The Desert’s Edge
    • New Horizons
  • Challenges
    • Sword
    • Shield
    • Bow
    • Spear
    • Two-Handed Weapon
    • Cannon
    • Rapier and Shield
    • Gun
    • Special Weapons
    • Horse
    • Training
    • Battle
    • Operation
    • Hunting
    • Life
    • Trade
    • Above the Law
    • Challenges and Changes
    • Shooting
    • Test of Strength
    • Duel
    • Racing
    • Mind Games
  • Bosses
  • Bells
  • Sealed Abyss Artifacts
  • Fast Travel Points
  • Abyss Puzzles
    • Ethereal Pathway
    • Axiom Archive
    • Root’s End
    • Precipice of Truth
    • Ether Fragment
    • Forgotten Altar
    • Origin of Thoughts
    • Disconnected Truth
    • Riddle Square
    • Tomb of Perdition
    • Passage of Malice
    • Desert Fragment
    • Cradle of Truth
    • Ascetic’s Rest
    • Path of Serpents
    • Crossroads of Uncertainty
    • Crow’s Nest
    • Crescent Skybridge
    • Monolith Crown
    • Skyloop Bridge
    • Ether Rest
    • Sanctorum of Darkness
    • Twisted Thicketway
    • Path of Trials
    • Frostbitten Paradise
    • Tree of Slumber
    • Loop of Life
    • Vault of Vengeance
    • Sanctorum of Insight
    • Ice Cradle
    • Altar of Solitude
    • Courtyard of Precision
    • Secret Garden
    • Nest of Valor
    • Sanctum of Transcendence
    • Throne of Truth
    • Dimensional Labyrinth
    • Roots of Truth
    • Chaos Forest
    • Dimensional Bonds
  • Secret Places
  • Ancient Ruins
    • Steel Mountains Ruins
    • Trembling Woods Ruins
    • Deepfog Basin Everfrost Ruins
    • Duskwood Hill Ruins
    • Timberdale Cliff Ruins
    • Timberdale Gorge Ruins
    • Hunter’s Cabin Ruins
    • Wiggling Hill Ruins
    • Blue Thicket Ruins
    • Black Wall Ruins
    • Meandering Hills Ruins
    • Duskwood Waterside Ruins
    • Beardtree Hills Rock Ruins
    • Precipice of Echoes Ruins
    • Deepfog Basin Dragon Head Ruins
    • Five-Finger Mountain Icy Ruins
    • Five-Finger Mountain Valley Ruins
    • Red River Ruins
    • Bamboo Forest Seonangdang Ruins
    • Kingshield Mountains Ruins
    • Sunrise Plains Ruins
    • Golden Plains Ruins
    • Arboria Forest Ruins
    • Fuming Lands Ruins
    • Beardtree Hills Sunflower Ruins
    • Silver Wolf Mountain Ruins
    • Haunted Hill Ruins
    • Halssius Conflux Ruins
    • The Grey Forest Ruins
    • Drakesfall Gorge Ruins
    • Mount Benus Ruins
    • Dragon’s Stone Chamber Ruins
    • Hidden Chamber of Wisdom Ruins
    • Secret Chamber of the Golden Plains Ruins
    • The Screaming Vault Ruins
    • Memory-Laden Ruins
    • Azure Moon Labyrinth Ruins
  • Mazes
  • Sanctums
    • Sanctum of Absolution
    • Sanctum of Temperance
    • Sanctum of Penitence
    • Sanctum of Benediction
    • Sanctum of Exaltation
    • Sanctum of Solace
    • Sanctum of Deliverance
    • Sanctum of Atonement
    • Sanctum of Devotion
    • Sanctum of Veneration
    • Sanctum of Oblation
    • Sanctum of Faith
    • Sanctum of Expiation
    • Sanctum of Renunciation
    • Sanctum of Revelation
    • Sanctum of Mortification
  • Spires
    • Spire of the Stars
    • Spire of Soaring
    • Spire of the Sun
    • Spire of Insight
    • Spire of Ringing Truth
    • Spire of Frost
    • Spire of Clockwork
  • Constellations
  • Legendary Animals
  • New Powers
  • Witches
  • Crafting Items
    • Timber & Fine Timber
    • Iron Ore
    • Copper Ore
    • Bloodstone
    • Scolecite Ore
    • Gold Ore
    • Silver Ore
    • Bismuth Ore
    • Azurite
    • Garnet
    • Epidote
    • Diamond
    • Small Bone
    • Large Bone
    • Thin Hide
    • Thick Hide
    • Short Hair Hide
    • Long Hair Hide
    • Sturdy Hide
    • Fang
    • Cloth Pieces
    • Fleece
    • Feather
    • Ivory
    • Aeserion’s Scale
  • Tips & Tricks
    • How To Get Money Fast
    • How to Use Storage Chest
    • How to Unlock Dragon
    • How to Unlock Robot Mount
    • How to Upgrade Weapons / Armor
    • How to Increase Inventory Size
    • How to Get Healing Items
    • How To Sheathe Weapon
    • How to Skip Time
    • How to Get Pets
    • How to Fish
    • How To Tame Horses
    • Elemental Skills
  • World Map
  • Trophy Guide
  • Terms of Service
  • Privacy Policy
  • Cookie Policy
  • YouTube
  • Facebook
  • Twitter

© 2008-2026 PowerPyx.com, all rights reserved.