PowerPyx.com

PowerPyx

  • Trophy Guides
  • Game Guides
  • Wikis
  • Trophy Lists
  • Next Guides
  • Contact
Show SearchHide Search
Home » Game Guides » Crimson Desert » Crimson Desert Deferred Advance Walkthrough

Crimson Desert Deferred Advance Walkthrough

March 29, 2026 by PowerPyx Leave a Comment

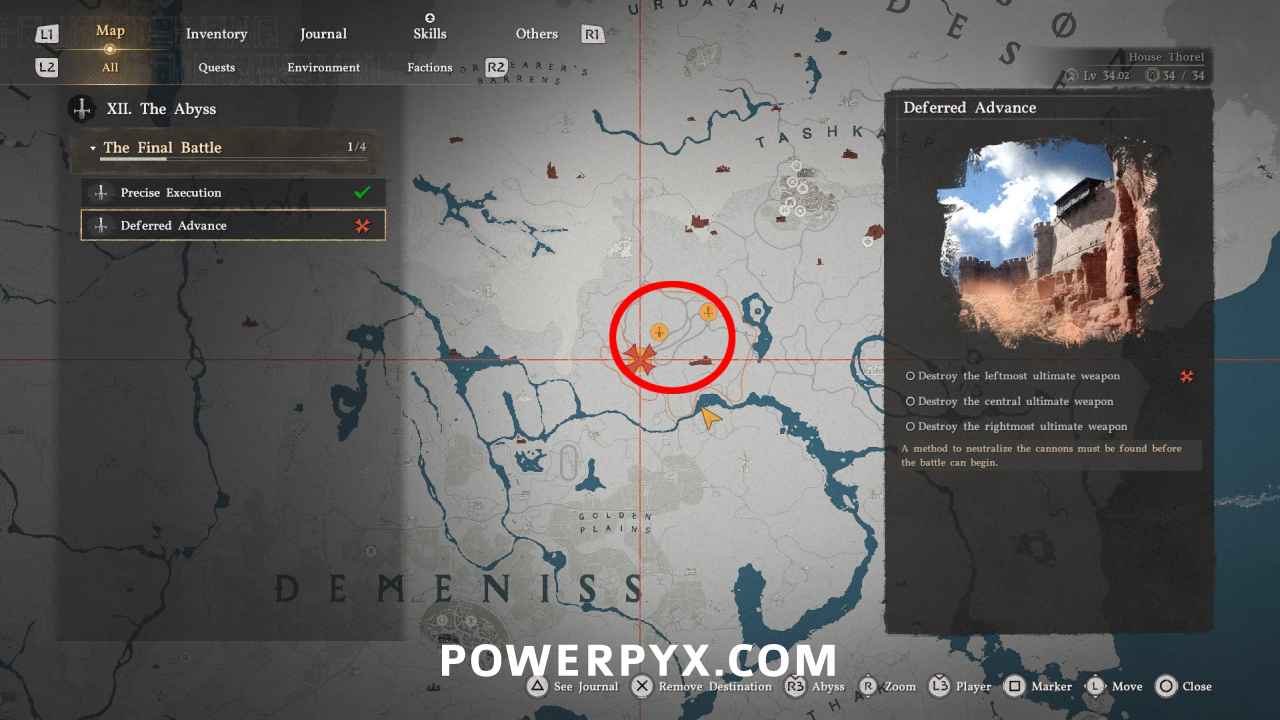
Deferred Advance is the 156th main mission in Crimson Desert. This walkthrough will guide you through all objectives of the Deferred Advance main quest.

  • Starting Location: Demeniss region
  • Chapter: 12 – The Abyss
  • Sub-Chapter: The Final Battle
  • Requirement: Finished previous main quest Precise Execution
  • Reward: None
  • Quest Description: A method to neutralize cannons must be found before the battle can begin.

Objectives:

  1. Destroy the leftmost ultimate weapon
  2. Destroy the central ultimate weapon
  3. Destroy the rightmost ultimate weapon

Destroy the leftmost ultimate weapon / Destroy the central ultimate weapon / Destroy the rightmost ultimate weapon

Call the Dragon with D-Pad :up: and fly toward the quest marker.


You must destroy 3 cannons that will shoot you on the dragon. Problem is you can’t heal, and if you dismount or fly away it counts as dying. The dragon has limited health as displayed by the purple bar in the bottom left of the screen. If the dragon’s health gets low (around 5%) it fails the quest and you must destroy all cannons again. They have to be destroyed in a single life.

This is one of the hardest quests in the game, the cannons and blimps deal a lot of damage. Luckily, there are a bunch of workarounds to make it much easier. Also refer to the video above for a demonstration. It’s important to destroy the blimps first, and to hide on the ground to let your stamina recharge so you can shoot faster.

Follow these steps:

  1. First, destroy all Blimps. They are what’s shooting homing missiles at you the entire time and they deal the most damage over time. Shoot each blimp in the sky with :r1: / :rb: . Ignore the cannons for now.
  2. Destroy the rightmost cannon first! When dying it will spawn you at the left cannon, but the right cannon is by far the hardest and the one you want to destroy first. If you always destroy the left and middle cannon first you risk dying at the final cannon and are wasting time on each attempt. The right cannon shoots fast projectiles that track you and deal the most damage. Fly as close to the ground as possible below the mountain the cannon is on. If you’re at the right angle, you can still hit the cannon but it can’t hit you! This way you can destroy it without it shooting you at all. You can also land on the ground ( :square: / :x1: ). The middle cannon will occasionally shoot homing rockets but they don’t deal much damage. Getting the correct angle is a bit finicky, if you see the cannon’s red laser immediately hide on the floor where it can’t hit you.
  3. Destroy the middle cannon second. The trick is to land on the floor below the mountain so it can’t target you, let your stamina recharge fully. Then fly in circles around it and hold :r1: / :rb: to quickly shoot the yellow-glowing part of the turret’s base until your stamina runs out. Then land again on the floor until your stamina is fully. You shoot fire balls much faster while you have stamina, so you expose yourself to damage for shorter periods than staying in the air with depleted stamina the entire time. You can destroy the cannon with 3 full stamina bars.
  4. Destroy the left cannon last, it’s the easiest by far. Flying in big circles around it and stay at a far distance, the slow bullets will almost never hit you and deal very little damage. Target the yellow glowing part of the turret where it’s shooting from.

It will likely take a few attempts. If you can destroy the rightmost cannon with 50% health remaining you should make it easily. It all comes down to not taking much damage while destroying all blimps, and destroying the rightmost cannon while staying at a low angle where you can’t get hit.

This finishes Deferred Advance in Crimson Desert.

For all other Quests refer to Crimson Desert Walkthrough.

« PrevCrimson Desert Precise Execution WalkthroughNext »Crimson Desert Departure of the Brave Walkthrough
Share
Tweet
Shares 0

Filed Under: Crimson Desert, Game Guides

Leave a Reply Cancel reply

Your email address will not be published. Required fields are marked *

Youtube 1,220,000Subscriber
Facebook 15,000Fans
Twitter 19,200Followers

Latest Trophy Guides

Crimson Desert Trophy Guide

God of War Sons of Sparta Trophy Guide

Marathon Trophy Guide

Resident Evil Requiem Trophy Guide

Reanimal Trophy Guide

Nioh 3 Trophy Guide

Code Vein 2 Trophy Guide

Arknights: Endfield Trophy Guide

Ghost of Yotei Trophy Guide

Silent Hill f Trophy Guide

Borderlands 4 Trophy Guide

Kingdom Come Deliverance 2 Trophy Guide

Red Dead Redemption 2 Trophy Guide

Latest Game Wikis

Crimson Desert Wiki

Resident Evil Requiem Wiki

Ghost of Yotei Wiki

Borderlands 4 Wiki

Kingdom Come Deliverance 2 Wiki

Elden Ring Wiki

Hogwarts Legacy Wiki

God of War Ragnarok Wiki

Cyberpunk 2077 Wiki

Red Dead Redemption 2 Wiki

Recent Posts

  • Crimson Desert Sanctum of Revelation Walkthrough
  • Crimson Desert Sanctum of Renunciation Walkthrough
  • Crimson Desert Sanctum of Expiation Walkthrough
  • Crimson Desert Darkbringer Sword Location
  • Crimson Desert Sanctum of Veneration Walkthrough

Crimson Desert Wiki

  • Wiki
  • Walkthrough
    • Unfamiliar Lands
    • In Ashes
    • Realm of Uncertainty
    • New Journey
    • Where Rumors Gather
    • Mysterious Man
    • True Wisdom in Kindness
    • Actions Speak Louder than Words
    • Heart Beyond Borders
    • Mystical Key
    • Polar Opposites
    • Abyss Without Balance
    • Woman in White
    • Where the Light Leads
    • Memory Fragment
    • Reunion
    • For Honor
    • Awestruck
    • Shadow Cast Over the River
    • Where Misery Gathers
    • Trial After Trial
    • The Man Trapped in the Mire
    • Missing Companion
    • Secrets Hidden in the Dark
    • The Dark Veil
    • The Flames of Greed
    • Kidnapped Healer
    • Rebellion or Revolution
    • Cheers Echoing From the Edge
    • Old Friend
    • First Step to Rebuilding
    • A Fresh Start
    • Reward for Their Sweat
    • Return of the Comrade
    • Familiar Curses
    • Return
    • Traces in the Manor
    • Nonhuman
    • Seed of Unease
    • Dance with the Devil
    • Hope After the Draught
    • Scattered Comrades
    • Rumors from the Sawmill
    • A Gentle Touch
    • Bustling Hill
    • Greymanes Reunited
    • Kilnden Workshop
    • Kiln Repair at the Kilnden Workshop
    • The Mysterious Pot
    • The Iron Pot’s Usage
    • Disturbance at the Arena
    • Skilled in Archery
    • The Words of Alustin
    • Scholastone
    • On the Right Path
    • Gate to the Otherworld
    • Spire of the Stars
    • Obsession and Madness
    • Casted Shadow
    • Double-sided Invitation
    • Unwelcomed Guests
    • Demenissian Delegation
    • Exposed Plot
    • The Missing Seal
    • Crowcaller
    • The Crow’s Warning
    • Bloodwind
    • Secret at the Church
    • Toward the Nest (Spire of Soaring)
    • News
    • To the Battlefield
    • The Counterattack
    • Cradle of Defense
    • The Touch of Deliverance
    • Fire on the Frontlines
    • Fire Support
    • In Ashes
    • Hidden Fangs
    • Reclamation
    • A Thousand Troops
    • Traitor
    • All Quiet on the Front
    • News of Victory
    • Return Home
    • Ashes of Treachery
    • Trust Lost
    • Bared Fang
    • Rekindled Hope
    • Podium of Resolve
    • Shadows Over Pailune
    • Driving out the Shadows
    • Lurking Wolves
    • Reclamation
    • Lonely Jackals
    • Resolution
    • The Counterattack
    • Unleashed Fury
    • The Final Bridge
    • Broken Claws
    • Battle at Silverwolf Mountain
    • Incomplete Victory
    • Ludvig’s Whereabouts
    • Time to Face Justice
    • Healing Pailune
    • A Bond
    • Ritual Preparations
    • Where the Wind Guides You
    • Chasing a Shadow
    • Blazing Fire
    • Whispering Shadows
    • Bloodied Invitation
    • Resolve Amidst a Storm
    • Preparations for Advance
    • Rebel Suppression
    • The Cursed Knight
    • The Blood Coronation
    • Clue
    • A Fleeting Dream
    • An Unknown Voice
    • Cloister of Enlightenment
    • Mark of the Scar
    • Shackles of Fate
    • Crossing Point
    • Unwavering Steps
    • Morning Fog
    • Jijeong Temple in Chaos
    • Path to Enlightenment
    • Path of the Disciple
    • True Strength
    • Face the Inner Self
    • Fragments of Darkness
    • Pursuit Beyond the Veil
    • Black Witch
    • The Cloister of Enlightenment
    • The Sage of the Desert
    • New Perspectives
    • Lust for Power
    • Untouchable
    • The Gate of War
    • Master of the Ironworks
    • Hidden Ace
    • Clockwork Insect Clash
    • Beating Heart
    • Invaders from the East
    • Frozen Hearted Predator
    • Lingering Shadow
    • The City of Steel
    • Crossroads
    • Strange Manor
    • Fortress Keys
    • Truth and Lies
    • Master of a Forgotten Land
    • Whispers in the Wind
    • Cloud Fortress Orbian
    • Precise Execution
    • Deferred Advance
    • Departure of the Brave
    • Forbidden Gate
  • Bosses
  • Bells
  • Sealed Abyss Artifacts
  • Fast Travel Points
  • Secret Places
  • Ancient Ruins
  • Spires
  • Sanctums
    • Sanctum of Absolution
    • Sanctum of Temperance
    • Sanctum of Penitence
    • Sanctum of Benediction
    • Sanctum of Exaltation
    • Sanctum of Solace
    • Sanctum of Deliverance
    • Sanctum of Atonement
    • Sanctum of Devotion
    • Sanctum of Veneration
    • Sanctum of Oblation
    • Sanctum of Faith
    • Sanctum of Expiation
    • Sanctum of Renunciation
    • Sanctum of Revelation
    • Sanctum of Mortification
  • Witches
  • Challenges
    • Sword
    • Shield
    • Bow
    • Spear
    • Two-Handed Weapon
    • Cannon
    • Rapier and Shield
    • Gun
    • Special Weapons
    • Horse
    • Training
    • Battle
    • Operation
    • Hunting
    • Life
    • Trade
    • Above the Law
    • Challenges and Changes
    • Test of Strength
    • Duel
  • Crafting Items
    • Timber & Fine Timber
    • Iron Ore
    • Copper Ore
    • Bloodstone
    • Scolecite Ore
    • Gold Ore
    • Silver Ore
    • Bismuth Ore
    • Azurite
    • Garnet
    • Epidote
    • Diamond
    • Small Bone
    • Large Bone
    • Thin Hide
    • Thick Hide
    • Short Hair Hide
    • Long Hair Hide
    • Sturdy Hide
    • Fang
    • Cloth Pieces
    • Fleece
    • Feather
    • Ivory
  • Tips & Tricks
    • How To Get Money Fast
    • How to Use Storage Chest
    • How to Unlock Dragon
    • How to Unlock Robot Mount
    • How to Upgrade Weapons / Armor
    • How to Increase Inventory Size
    • How to Get Healing Items
    • How To Sheathe Weapon
    • How to Skip Time
    • How to Get Pets
    • How to Fish
    • How To Tame Horses
  • World Map
  • Trophy Guide
  • Terms of Service
  • Privacy Policy
  • Cookie Policy
  • YouTube
  • Facebook
  • Twitter

© 2008-2026 PowerPyx.com, all rights reserved.