
The Feeble and the Furious is a side mission in Borderlands 3 (BL3). This walkthrough will guide you through all objectives of The Feeble and the Furious Side Quest.
The Feeble and the Furious is unlocked when you reach the region “Devil’s Razor” during main mission Blood Drive.
Planet: Pandora
Area: Devil’s Razor
Quest Giver: Notice Board in Roland’s Rest (Devil’s Razor)
Requirement: Reach the region “Devil’s Razor” during main mission Blood Drive
Recommended Level: 30
Reward: $5392 + 7890 XP
Mission Info: Have a heart and give a sweet old man a ride around the desert. It’ll be good for him to get out of the house.
Objectives:
- Talk to Lizzie
- Drive Pappy’s jalopy
- Run errands
- Collect intact milkpods 0/5
- Meet coin dealer
- Find the coin dealer
- Collect coins: 0/5
- GET BACK IN THE CAR!
- Drive to the dentist
- Knock on the door
- Kill Dental Dan
- Take Dental Dan’s teeth
- GET BACK IN THE CAR!
- Take Pappy home
- Talk to Lizzie
Starting Location: The Feeble and the Furious


Talk to Lizzie
Head to the marked location to talk toe Lizzie, the one who posted the quest.


Drive Pappy’s jalopy
Jump in Pappy’s car, parked in the garage next to Lizzie.
Tip: Want to cut this quest short? Shoot and destroy Pappy’s car to kill him. Lizzie will be happy that the old man is gone and give you the quest reward immediately, allowing you to skip the rest of the mission.

Run errands
Drive to the marked spot and make sure you park in the blue spot in the direction the arrows are pointing. If you park your vehicle in the wrong direction the mission can’t proceed – so make sure the vehicle and parking arrows line up.


Collect intact milkpods 0/5
To get milkpods, you must shoot the insects spawning around the area (Milky Pawn, Milky Knight, Milky Queen, Milky Bishop). Shoot them with the car, then drive over their corpses to collect the blue mission items.

Meet coin dealer
Drive to the marked spot and park your car in the direction of the blue arrows on the floor.

Find the coin dealer
There’s no coin dealer in sight when we arrive. Walk into the dark tunnel. On the left side you find what’s left of the coin dealer – only his stiff corpse. Interact with it.

Collect coins: 0/5
Pappy seems somewhat excited that the dealer guy is dead and wants us to get his coin collection. Start by clearing out of all the enemies. Now for the actual coins – we’ll go through them one by one. The last 2 are tricky to find, basically you’ll have to climb all the way up via the pipes in the area. But let’s take it one step at a time, do it in this order to follow it more easily.
Coin Location #1: Bottom Floor where you fight the enemies, turn left and jump up the boxes to reach it.


Coin Location #2: At the end of the bottom floor, head up the stairs to the upper floor. There on a box sits this coin, easy to see this one.


Coin Location #3: Same floor as the last coin, on the pipes in the middle of the area. You must jump on one of the steel beams to walk over to the coin. This one’s still easy, the next 2 are more complicated.


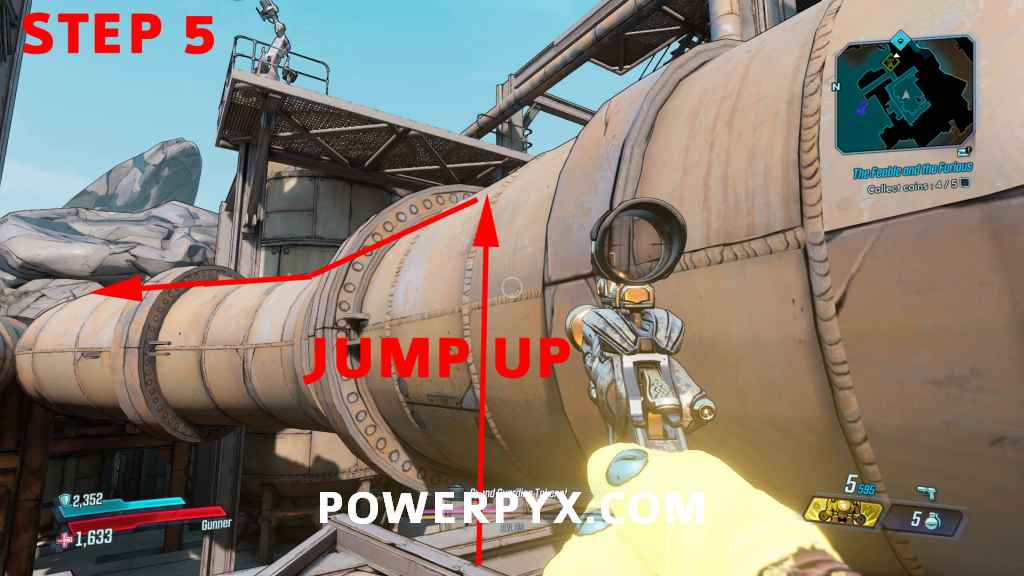
Coin Location #4: From the exact spot where the third coin is, follow the pipes up and climb the steel beams. Step by Step:
- First climb the pipe that stretches through the middle of the area (goes right by the third coin). At the end of that pipe you can climb up to a bigger pipe.

- Follow the fat pipe and climb up to the small pipe. Walk to roughly the middle of the pipe to where some steel beams lead up.

- Climb the steel beam.

- And the big broken pipe at the top (after climbing steel beam) you can retrieve the coin. Just jump into the broken pipe.


Coin Location #5: This coin is the trickiest by far, we’ll go through it Step by Step again.
- Climb the big broken pipe at the top of the area where Coin 4 was found in. If you fall down you must climb all the way up to Coin 4 again (see above 4 coin steps to get back here).

- At the end of the fat pipe, walk over the steel beams on the right side. Then climb up the cliff. This lets you reach a well hidden area and we’re very near to the fifth coin now.

- Go up the stairs to the top of the platform.

- And lastly, jump over the top of the silo. On the silo you find coin 5/5. All coins collected!


GET BACK IN THE CAR!
Return to Pappy in his car, where you parked it.
Drive to the dentist
Drive to the marked spot on the map.

Knock on the door
Press the reload button  /
/  on the door to knock. An enemy called Dental Dan will step out.
Kill Dental Dan
Kill Dan. A few headshots will do the trick.

Take Dental Dan’s teeth
Pick up the item that Dan dropped.
GET BACK IN THE CAR!
Jump back in the car.
Take Pappy home
And drive back to where the quest started. Park the car in the garage.
Talk to Lizzie
And you’re done! That was one of the longer quests in the game. No unique equipment reward, but you get money and XP.

This finishes The Feeble and the Furious side mission in Borderlands 3.
For all other Side Mission Walkthroughs, check out our complete Borderlands 3 Side Missions Walkthrough.
Nate says
Or you can simply blow up the vehicle with Pappy inside. This grants more $$$ since Lizzie gets her inheritance since Pappy dies. Quick alternative and the mission is still completed.
PowerPyx says
Lmao, that’s genius :D
I just tried and it works. Added to the walkthrough, thanks for sharing!
jr says
I just drove around back to the ledge and melee’d it off the cliff. But then I looked this up after just in case I needed to restart my save, lol.