PowerPyx.com

PowerPyx

  • Trophy Guides
  • Game Guides
  • Wikis
  • Reviews
  • Next Guides
  • Contact
Show SearchHide Search
Home » Game Guides » Borderlands 3 » Borderlands 3 Children of the Vault Walkthrough

Borderlands 3 Children of the Vault Walkthrough

September 12, 2019 by dalailama1989 Leave a Comment

Children of the Vault is the 1st main story mission in Borderlands 3 (BL3). This walkthrough will guide you through all objectives of the Children of the Vault Main Quest.

Before starting the game you get to pick between two difficulties “Easy” and “Normal”. You also get to choose between “Cooperation” (all co-op loot drops are instanced in your game and cannot be stolen away by other players, co-op enemies scale to your level) and “Coopetition” (in co-op only whoever is fastest to pick up the loot gets it and the other players get nothing, there’s no level scaling in co-op). After the first cutscene you can choose between the 4 characters Amara, Moze, Zane, FL4K. For the purpose of trophies and achievements it doesn’t matter what difficulty, what game mode, or what character you pick. Go with what you like, enjoy Borderlands 3, and now let’s jump into the Walkthrough!

Planet: Pandora
Area: Covenant Pass
Quest Giver: Claptrap
Requirement: None
Recommended Level: 1
Reward: $268 / 89XP / Common Grenade “Contact Grenade”
Trophy: :bronze: Welcome to the Crimson Raiders
Mission Info: Despite an ambush by the bandit cult known as the Children of the Vault, the Crimson Raiders successfully recruited a new Vault Hunter: you. Now their Siren leader Lilith needs you to infiltrate a COV propaganda center alongside what appears to be a yellow toaster with anxiety.

Objectives:

  • Follow Claptrap
  • Use the Quick-Change
  • Pull Lever
  • Open Chest
  • Get Gun from Cache
  • Kill COV enemies
  • Search Area for Shield
  • Take Shield
  • Find Shiv
  • Kill Shiv
  • Use Magnet Controls
  • Revive Claptrap
  • Speak with Lilith

Starting Location: Children of the Vault

Follow Claptrap

At the very start of our adventure, we need to follow our trusty yellow companion, as he brags about being the best once again.

Use the Quick-Change

Simply interact with the Quick-Change station once to complete this objective. It’s worth noting that later on you can reset your skill points at Quick-Change Station but during the first mission you haven’t unlocked any skills yet.

Pull Lever

Head to the right and pull the lever to open the gate for Claptrap (and yourself).

Open Chest

Follow along the path and wait for Claptrap to reveal the Chest Pandora-style!

Get Gun from Cache

Pick up the gun, proceed with him him to the gate and see his negotiating-skills – it will be time to spend our first bullets!

Kill COV enemies

Claptrap got attached to a big magnet and we need to take out a few enemies to get him back (surprise!). The first area only features a small amount of enemies and is a good time to familiarise yourself with the firing modes of your gun ( :down: to switch) and melee ( :r3: ) without worrying too much about your health.

Once the first few enemies are down, the gate will open and we may proceed in the next section, which features quite a few more bandits. This is a good time to make use of the cover all around the perimeter, to land some precisely aimed headshots & make use of the barrels to take out the enemies.

Search Area for Shield

Our next goal is to find a Shield. It will be located on some containers in the very north of this area.
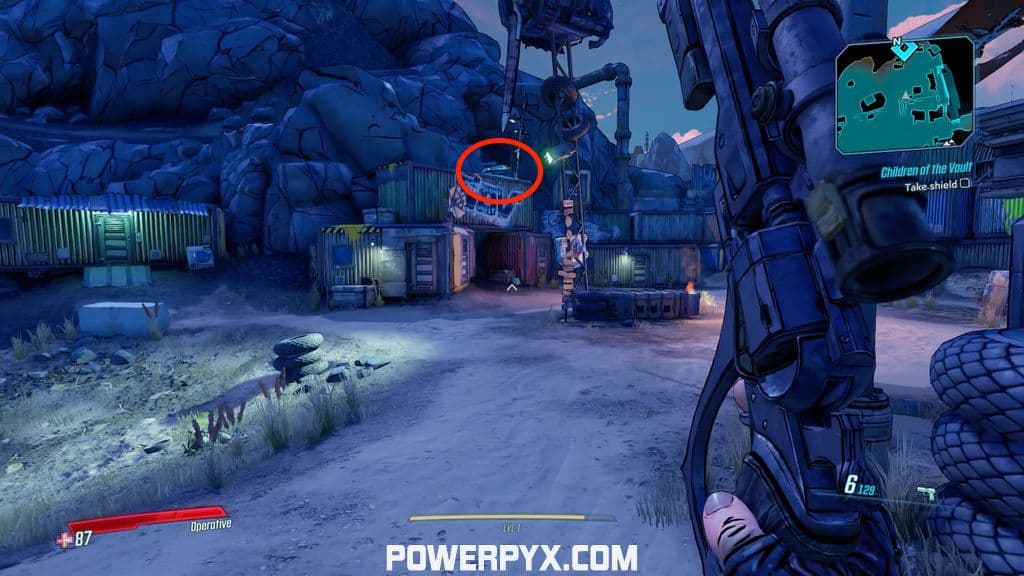
Take Shield

Open the crate and take out the goods.

Find Shiv

Once we are equipped with a Shield, we are good to head inside the compound and face our first mini-boss by the name of Shiv.

Kill Shiv

Feel free to walk outside again to open up the possibilities and have more room to evade his attacks. Once he goes for his ground-slam-attack, jump out the way, as this will take away a chunk of your health!

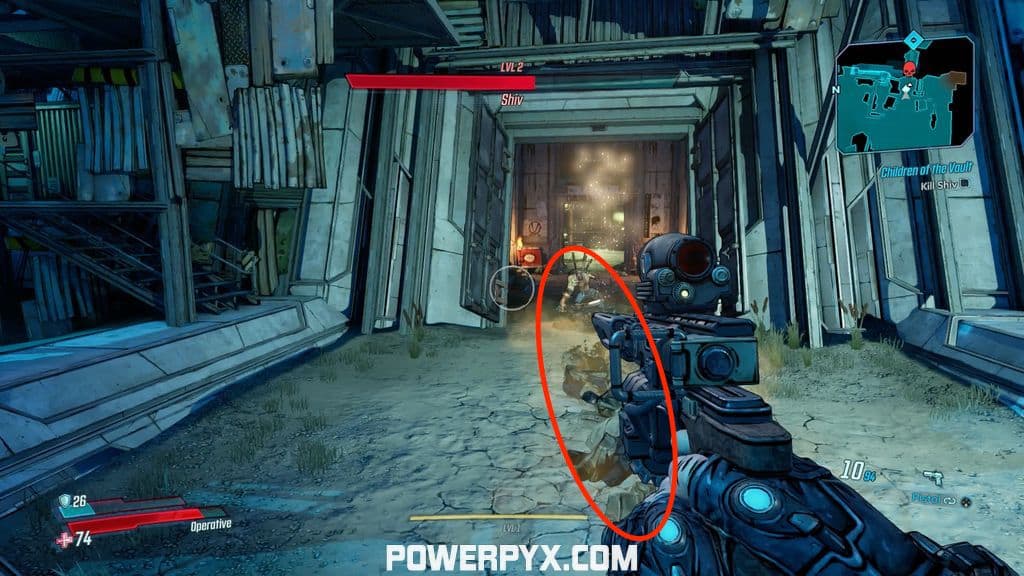
If you run out of ammo, circle around the area and loot the crates.
Shiv should not give you too much trouble, as long as you can stay clear of his attacks. We have to face bigger threats along our journey later!

Use Magnet Controls

When Shiv is down, walk inside his compound and up the stairs. These will lead to the Magnet Controls, overlooking the area.

Revive Claptrap

Surely, this will make Claptrap fall to the ground. Jump down and revive him.

Speak with Lilith

He will then send a signal to Lilith, who will appear moments later. Talk to her to finish this first Mission!
 

This finishes Children of the Vault main mission in Borderlands 3. Now the next quest From the Ground Up becomes available.

Next Up: From the Ground Up

For all other Mission Walkthroughs, check out our complete Borderlands 3 Walkthrough.

« PrevBorderlands 3 Full Walkthrough – All MissionsNext »Borderlands 3 From the Ground Up Walkthrough
Share
Tweet
Shares 0

Filed Under: Borderlands 3, Game Guides

Leave a Reply Cancel reply

Your email address will not be published. Required fields are marked *

Youtube 870,000Subscriber
Facebook 10,006Fans
Twitter 11,288Followers

Latest Trophy Guides

Hitman 3 Trophy Guide

Cyberpunk 2077 Trophy Guide

Assassin's Creed Valhalla Trophy Guide

Call of Duty: Black Ops Cold War Trophy Guide

Demon's Souls PS5 Remake Trophy Guide

Spider-Man Miles Morales Trophy Guide

Astro's Playroom Trophy Guide

Sackboy: A Big Adventure Trophy Guide

Bugsnax Trophy Guide

Yakuza Like a Dragon Trophy Guide

Watch Dogs Legion Trophy Guide

Red Dead Redemption 2 Trophy Guide

Latest Game Wikis

Hitman 3 Wiki

Cyberpunk 2077 Wiki

Assassin's Creed Valhalla Wiki

Ghost of Tsushima Wiki

The Last of Us 2 Wiki

Final Fantasy VII Remake Wiki

Pokemon Sword & Shield Wiki

Borderlands 3 Wiki

Sekiro Shadows Die Twice Wiki

Red Dead Redemption 2 Wiki

God of War Wiki

Far Cry 5 Wiki

Recent Posts

  • Hitman 3 Berlin (Germany) Silent Assassin, Suit Only
  • Hitman 3 Dartmoor (England) All Challenges Guide
  • Hitman 3 Dartmoor (England) Silent Assassin, Suit Only & Sniper Assassin
  • Hitman 3 Challenges Guide (Masteries)
  • Hitman 3 Dubai (UAE) Silent Assassin, Suit Only & Sniper Assassin

Borderlands 3 Wiki

  • Wiki Home
  • Walkthrough
    • Children of the Vault
    • From the Ground Up
    • Cult Following
    • Taking Flight
    • Sanctuary
    • Hostile Takeover
    • The Impending Storm
    • Space-Laser Tag
    • Atlas, At Last
    • Beneath the Meridian
    • Hammerlocked
    • Lair of the Harpy
    • The Guns of Reliance
    • The Family Jewel
    • Going Rogue
    • Cold as the Grave
    • Blood Drive
    • Angels and Speed Demons
    • The Great Vault
    • The First Vault Hunter
    • Footsteps of Giants
    • In the Shadow of Starlight
    • Divine Retribution
  • Side Missions
    • Powerful Connections
    • Bad Reception
    • Golden Calves
    • Dump on Dumptruck
    • Under Taker
    • Skag Dog Days
    • Head Case
    • Just a Prick
    • Healers and Dealers
    • Maliwannabees
    • Rise and Grind
    • Dynasty Diner
    • Kill Killavolt
    • Porta Prison
    • Proof of Wife
    • Holy Spirits
    • Invasion of Privacy
    • Opposition Research
    • Technical NOGout
    • Ratch’d Up
    • Don’t Truck with Eden-6
    • Get Quick, Slick
    • On the Blood Path
    • The Kevin Konundrum
    • Witch’s Brew
    • Sacked
    • Malevolent Practice
    • Irregular Customers
    • Capture the Frag
    • Swamp Bro
    • Dynasty Dash: Eden 6 / Floodmoor Basin
    • Rumble In The Jungle
    • Sell Out
    • Raiders of the Lost Rock
    • Pandora’s Next Top Mouthpiece
    • ECHOnet Neutrality
    • The Feeble and the Furious
    • Dynasty Dash: Pandora / Devil’s Razor
    • Buff Film Buff
    • Boom Boom Boomtown
    • Sheega’s All That
    • Life of the Party
    • The Homestead
    • The Homestead (Part 2)
    • The Homestead (Part 3)
    • Just Desserts
    • Let’s Get It Vaughn
    • The Demon in the Dark
    • Childhood’s End
    • Wildlife Conservation
    • Cannonization
    • Bad Vibrations
    • Fire in the Sky
    • Homeopathological
    • It’s Alive
    • Transaction-Packed
    • Baby Dancer
    • Kill Demoskaggon
    • Kill Borman Nates
    • Kill Wick and Warty
    • Kill Urist McEnforcer
    • Kill Dinklebot
    • Kill Power Troopers
    • Kill the Grogans and Their Mother
    • Kill IndoTyrant
    • Kill El Dragón Jr
    • Kill Red Jabber
    • Kill The Unstoppable
    • Kill Maxitrillion
    • Kill Rakkman
    • Kill Road Dog
    • Kill Tarantella
    • Kill Captain Thunk and Sloth
  • Boss Guide
  • All Named Locations
    • Pandora
    • Promethea
    • Athenas
    • Eden-6
    • Nekrotafeyo
  • Circles of Slaughter Locations
  • Proving Grounds Locations (Trials)
  • Eridian Writings (Slabs)
  • Red Chests
  • Crew Challenges
    • Hammerlock’s Legendary Hunts
    • Zero’s Targets of Opportunity
    • Typhon Logs & Dead Drops
    • Hijack Targets (Vehicle Parts)
    • Crimson Radios
    • Dead Claptraps
    • Pieces of Resistance
    • Mayor’s Killer Looks
    • Torgue’s Marketing Mistakes
    • Hammerlock’s Occult Hunts
    • Gaige’s Gifts
    • Mancubus’ Eldritch Statues
    • Creature Feature Film Reels
    • Sato’s Saga Journals
    • Sato’s Caches
    • Good Prospects
    • Skin to Win
    • Gehenna’s Most Wanted
    • Signal to Noise Probes
  • How to Invite Friends to Co-Op
  • How to Reset Skill Points
  • How to Get Eridium
  • Duplication Exploit & Infinite Money
  • Easter Eggs
  • Trophy List
  • Trophy Guide
  • DLC #1: Moxxi’s Heist of the Handsome Jackpot Trophy Guide
  • DLC #2: Guns, Love, and Tentacles Trophy Guide
  • DLC #3: Bounty of Blood Trophy Guide
  • DLC #4: Psycho Krieg and the Fantastic Fustercluck Trophy Guide
  • Terms of Service
  • Privacy Policy
  • Cookie Policy
  • Review Policy
  • YouTube
  • Facebook
  • Twitter

© 2008-2021 PowerPyx.com, all rights reserved.