
Pilgrim’s Path is a Story Quest (Main Mission) in Dying Light 2. This walkthrough will guide you through all objectives of the Pilgrim’s Path Story Mission.
Region: Prologue-exclusive area (cannot be revisited)
Quest Giver: N/A
Requirement: N/A
Reward: 1000 Combat XP, 1000 Parkour XP
Mission Info: As I was escaping from the infected on an abandoned highway, I met a fellow Pilgrim.
Objectives:
- Climb to the ledge
- Follow Spike
- Collect honey and chamomile
- Return to Spike
- Craft healing medicine
- Follow Spike
- Search the house
- Explore the garden
- Join Spike on the terrace
- Get to the radio antenna
- Search for a safe place to sleep
- Clear the area of Infected
- Wait until morning
- Meet the contact in the metro tunnels
- Find Spike’s contact
- Eliminate the masked thugs
- Check on the contact
- Eliminate the thugs
- Escape with the contact
- Escape from Waltz and his henchman
- Get to Villedor
Climb to the ledge
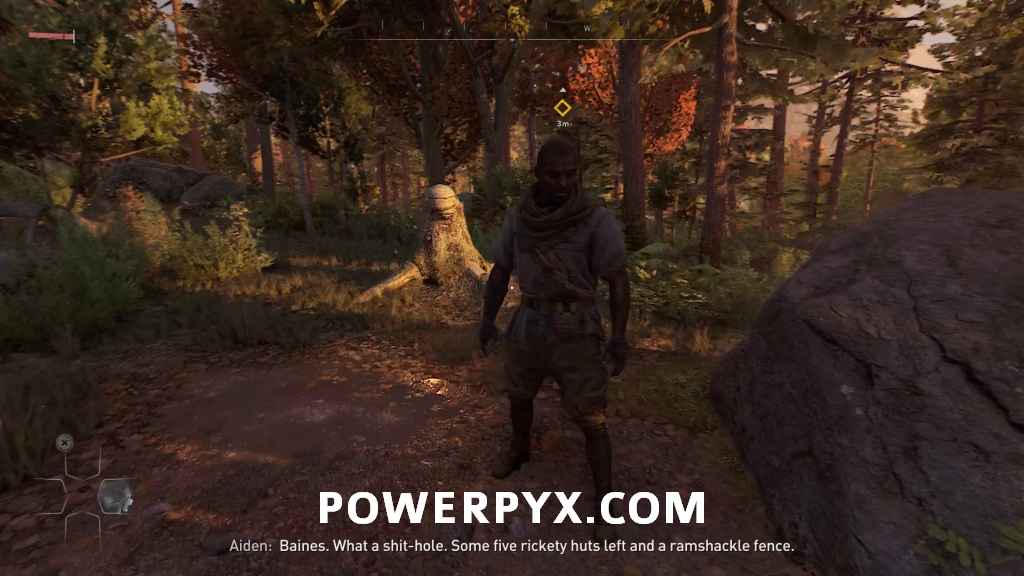
After the initial cutscenes explaining the story, you’re dropped right into an open area outside to start the game. Follow the initial objective markers, which will lead you through climbing up some ledges, introducing basic parkour movement.

At the top you’ll catch back up to Spike, the man Aiden is currently traveling with. Continue following him through the forest.

Follow Spike
Keep following Spike up a couple of ledges, and he’ll eventually stop in a small clearing.
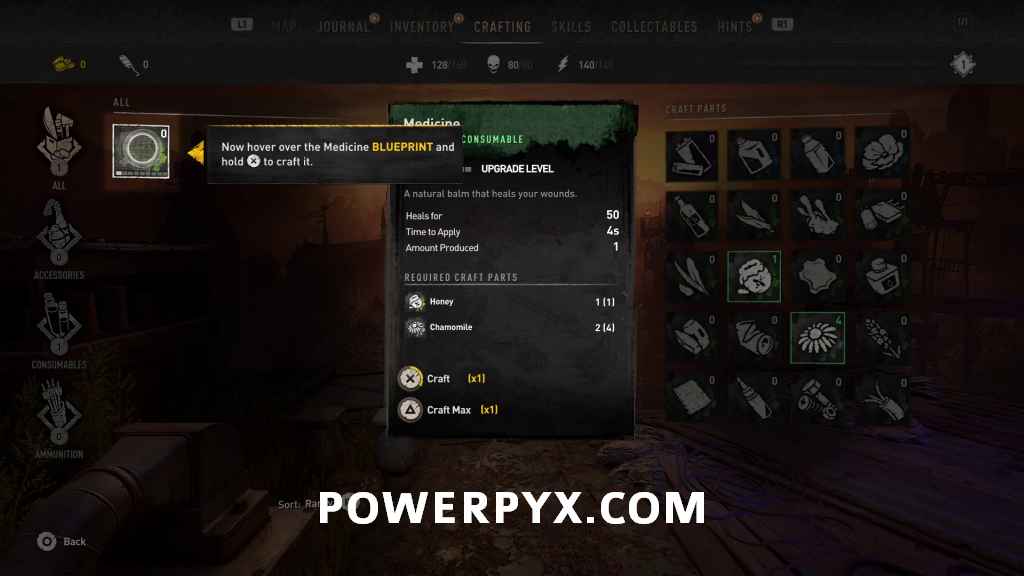
Collect honey and chamomile
Spike points out a nearby Beehive, and suggests you collect from it. Collecting from Beehives gives Honey, an item needed to craft Medicine. Holding  triggers Survivor Sense, which highlights items in the environment that can be collected with a small circle representing their rarity value.

Turn to the left from the beehive and you should spot a ledge. Go towards it and use your Survivor Sense again and you should spot some Chamomile below and on top of the ledge, which is the other item needed to craft Medicine. Collect at least 2 of them.

Return to Spike
Once you’ve grabbed both types of items, walk back over to Spike.
Craft healing medicine
After Spike finishes talking you’ll obtain the blueprint for Medicine. Open your menu when prompted and craft some Medicine.
Follow Spike
Continue following Spike through the forest after crafting the Medicine until you reach the gate in front of large house. Follow him through into the yard.

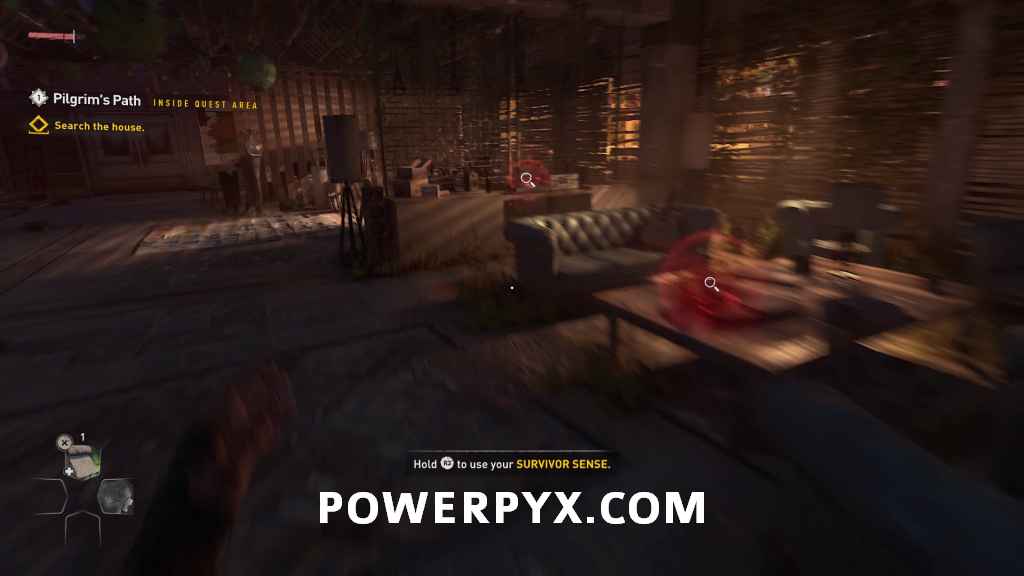
Search the house
Go around to the left side of the house, then crouch underneath the partially open garage door to get inside.

You can use your Survivor Sense inside the house to spot items that can be looted, as well as some items to interact with highlighted with red aura and a magnifying glass. THERE IS AN EXTREMELY MISSABLE COLLECTIBLE IN THIS FIRST AREA. Look on the table to the back where you can spot a newspaper highlighted in red with Survivor’s Sense. Unlike most of the other red highlighted items, this is actually counted as a collectible that is added to your inventory. If you miss it here you cannot go back for it after leaving this prologue area, so make sure to grab it now.
Memento: Newspaper Article – October 11th, 2020
 |
 |
Turn around from there and enter the blue door on the opposite side of the room to cause Spike to enter and open the opposite set of double doors into the next room. There are some more items in here you can interact with using Survivor Sense, but none are counted as collectibles or required to progress.
You can search around in here as much as you want, then interact with the double doors at the far end beside the piano to continue to the next area.
Explore the garden
There will be a short scene where Aiden reads an item on the bar in the next room, then you’ll need to explore the area outside to continue. There are a handful more items you can interact with, but to progress, you need to go to the far table and interact with the letter on the table. This is counted as a collectible as well, but you need to interact with it to progress in this area, so it isn’t missable.
Memento: Letter – Goodbye Letter

Join Spike on the terrace
Spike calls you up to the terrace above. Climb up on the leaf-covered parts to reach the upper area, then go over and interact with Spike. He gives you a weapon, then you have some conversation with him. Choices with white text are optional extra choices for more information or more conversation, and yellow ones progress the conversation. If there are multiple yellow choices they both progress the conversation but don’t have major consequences until the point you reach choices that are timed.

Get to the radio antenna
After the conversation with Spike, he leaves on his own, and Aiden is planning to continue to the nearby radio tower to try to contact someone. Drop down off the side of the terrace through the spot with the missing railing, then follow the path.

You’ll reach a high ledge above a lake. You need to progress down to the lower building, which can be accomplished by following the cliff path down to the left, or just jumping off the ledge into the water.

At the building, you’ll encounter your first set of infected. You can deal with them and search the area for extra supplies, then continue following the marked path. You’ll need to jump into the water in the next area, then climb on top of the truck and into the hanging bus to climb up to the road above.

On the road above you will need to climb up onto the top of a truck to start moving into the tunnel. Stay on top of the structures moving between the vehicles to avoid all of the sleeping infected below in the tunnel.

On the other side of the tunnel, there will be more cliffs to climb. Follow the path using the broken ladders and other structures to keep moving to the top.

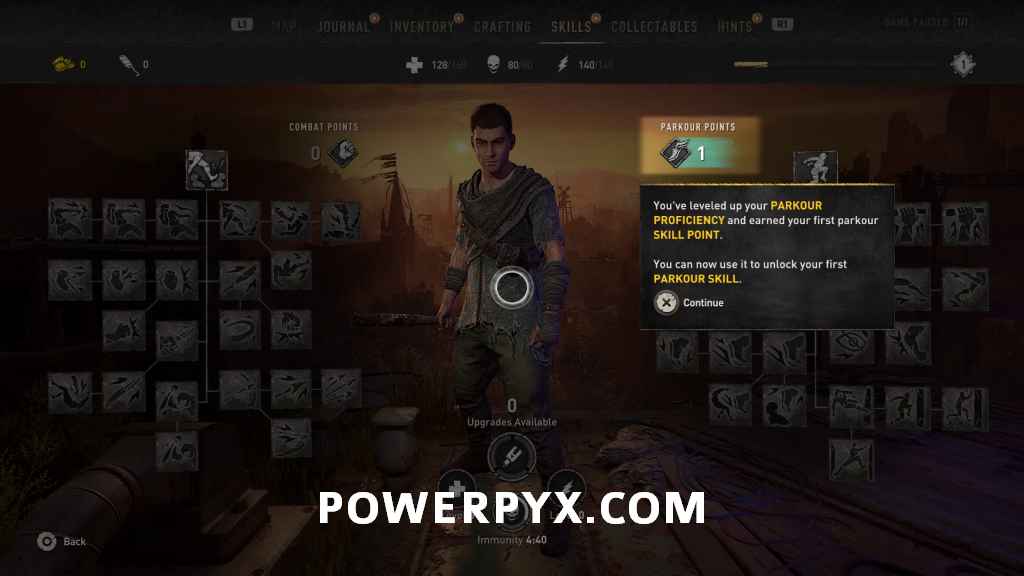
After going through the tunnel and swinging on a rope, you’ll automatically level up your parkour level, and the game will prompt you to unlock your first parkour skill.
Continue up the cliffs to the marked area to find a building.
Search for a safe place to sleep
If you want you can enter the building first by jumping through the window you can, but you need to do something outside first to be able to progress.

Interact with the red garage door on the other building to progress.

Clear the area of Infected
After interacting with the door a number of infected will spawn, along with a special jumping one. The game prompts you on avoiding power attacks with dodging, and you need to clear all of the infected in the area to progress.
Once the special infected is killed then other ones will stop spawning, so you need to clear them out to continue. Go back to the garage door and interact with it again, then interact with the generator inside to turn on the power in the main building.

Wait until morning
Go into the main building and upstairs. You can use Survivors Sense to spot tracks on the floor, leading to a bookshelf you can push out of the way to enter a Safezone. Interact with the bed to sleep until morning.

Aiden will have a flashback scene, then when he wakes up he will automatically move to use the radio in the room. You can cycle through the frequencies if you want, but the correct one to select to progress is 140.200MHz.

Meet the contact in the metro tunnels
Aiden speaks with the contact on the radio, then you need to progress through the area and reach the Metro Tunnels. Follow the marked path back down the mountains past the radio tower. You can use the nearby zipline to get down quickly.

THERE IS ANOTHER EXTREMELY MISSABLE COLLECTIBLE IN THIS AREA. In the area immediately after the zipline, there is a church building. You need to go inside this building to find a collectible which can currently only be obtained right now. If you miss it you cannot currently come back for it. Inside on the white covered table at the front there is a book, interact with it to pick it up. You can also use Survivor’s Sense to look for collectibles like this, they will have a yellowish-orange circle representing the highest item rarity.
Memento: Paradise Lost, Book IV
 |
 |
After this there aren’t any major items to watch out for in this prologue area, so you can continue forward towards the objective.

You will need to drop down onto the highway, then jump off the highway into the water to move towards the metro tunnels. There are a number of infected in this area you can smack around if you want, but no overly useful crafting supplies to be found, so you can just avoid all the infected and continue to the objective if you wish. You’ll need to jump from the building to the nearby cliff, then into the train car to get to the higher area.

To get into the tunnel itself, you need to jump onto the black military truck, then swing on the rope over the wall.

Follow the objective markers through the tunnels, there are no enemies or items to grab in here so you can just run through. At the end, you’ll have a few scenes where you finally meet Spike’s contact.
Find Spike’s contact
After the scenes, you will be by yourself again, and looking for where the contact went. You’ll now have a flashlight which you can turn on with  . Move towards the objective and break the crate and wood barrier with the yellow paint to continue through the tunnel.

You can jump over the monkey bars in the tunnel by jumping towards them, then jumping again at the farthest part of the swing to move forward. You’ll eventually reach a dead end, where you need to jump up into the air vent to continue.

Eliminate the masked thugs
After going through the tunnels you will encounter your first human enemies. The game will give a tutorial on how to perform perfect blocks, which you need to do to be able to continue. After performing the three perfect blocks you will be able to kill this first enemy.

Two more enemies will spawn out of the doors in the room, but they can be defeated immediately.

You will automatically level up your combat level after defeating those two enemies, and the game will prompt you on unlocking your first combat skill, a vault kick which can be performed after a perfect block.

Check on the contact
Go back and interact with the contact by the wall, and he’ll provide Aiden with some more information, as well as give an extremely important item, the GRE Access Key.
Eliminate the thugs
After speaking to him a group of three more enemies will appear, and the game will prompt you to perform three Vault Kicks. Like the Perfect Block tutorial before, you need to perform these three times before you can actually defeat the enemies.

After that group of three is defeated, another group of three will appear, which you can deal with immediately.
Escape with the contact
After the enemies are defeated, go back over and interact with the contact for a scene.
Escape from Waltz and his henchman
After the scenes are over, you just need to run through the tunnels to escape. There aren’t any items in here to grab, so continue following the objective marker.

Get to Villedor
After dropping down into some water, your objective will change, but you will need to keep following the objectives just the same. Once you reach the end of the tunnels and start climbing the ladder this quest will end, and the next one will start immediately.
This finishes Pilgrim’s Path story quest in Dying Light 2 Stay Human.
For all other Main Quests and Side Quests, check out the complete Dying Light 2 Walkthrough.
Leave a Reply