
Red Dead Redemption is the 87th main story mission in Red Dead Redemption 2 (RDR2). This walkthrough will guide you through all objectives of Red Dead Redemption Main Quest including all Gold Medals for 100% completion.
Red Dead Redemption begins automatically after completing Our Best Selves.
Quest Giver: N/A
Chapter: 6
Region: New Hanover
Gold Medal Requirements:
- Get 7 headshots while covering Sadie from the lighthouse
- After Sadie is captured, reach Abigail and Sadie within 1 minute
- Complete with at least 70% accuracy
- Complete the mission without taking any health items
Starting Location: Roanoke Ridge, New Hanover
This mission will begin immediately after completing Our Best Selves.

Rescue Abigail
- GOLD MEDAL: Complete the mission without taking any health items
- GOLD MEDAL: Complete with at least 70% accuracy
Riding into camp, you discover that Abigail has been kidnapped by the Pinkertons and took her to Van Horn where she will be put on a boat to be taken to trial for murder. Arthur wants to rescue her, but Micah convinces Dutch that they need to leave her behind. Looks like its just you and Sadie Adler against the world.

Follow Sadie to the town, talking about the situation with Dutch along the way. Take this opportunity to choose your sidearms. Unfortunately you won’t have access to your saddle inventory for the first part of this mission.

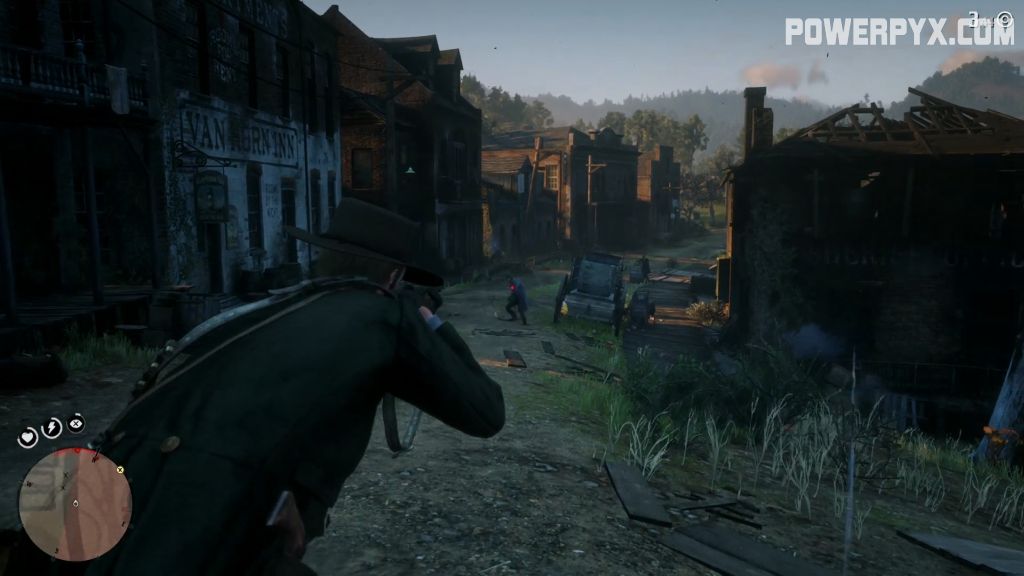
When you reach the town, you will dismount and Sadie will give you a rifle to cover her from the nearby lighthouse.

Run down the stone pathway and and climb the ladder leading to the walkway.

Go through the door in the base of the lighthouse and climb the stairs inside all the way to the top where you’ll have a great vantage point for sniping. A cinematic will show you scanning the area with your scope, and seeing Milton drag Abigail into a building on the far side of the docks.

Next, you will spot Sadie and follow her as she runs. When you regain control of the sight, get ready to headshot a lot of people quickly.
- GOLD MEDAL: Get 7 headshots while covering Sadie from the lighthouse
To get headshots quickly, you will likely have to use Dead Eye liberally, as you have to simultaneously protect Sadie, prevent her from killing your targets before you do, and get headshots on all of them. There are two Pinkertons right around the corner from Sadie’s starting position. Headshot them both. Five left to go.

Another will appear in the streets.

Two more at the edge of the docks.

There are another two snipers on balconies of buildings overlooking the docks.

And two more in the street next to the docks. You should have your 7 headshots by now, and if you do you can switch to center mass shots to conserve Dead Eye and keep your accuracy high.

There will now be one Pinkerton on the boardwalk and one in the covered balcony above him.

Further down the boardwalk, another pair of pinkertons will move up next to the small warehouse next to the target building.

Sadie will now have a straight shot into the building, but she is immediately ambushed inside.
- GOLD MEDAL: After Sadie is captured, reach Abigail and Sadie within 1 minute

Skip the cinematic, and get moving! Luckily you will start out on the street so you don’t have to climb down from the lighthouse, but there will be a lot of guys in the street to slow you down. With only a minute, you have no time to spare. Just start running and ignore all of the Pinkertons unless they are directly in your way.
Run down the boardwalk to the building and kick the door down.

Inside, you will immediately go into Dead Eye.

The Pinkertons will react quickly and go for their weapons, but the one on the left is faster. Kill the Pinkerton on the left first, then the one on the right.

As you move in to free Abigail and Sadie, Mr. Milton will get the jump on you and monologue for a bit, revealing who the real traitor in your camp was.

Keep him talking for a while and eventually Arthur will make his move. Hammer the  /
/  to grapple with Milton and try to turn the tables, however you are just too weak.

Luckily Abigail is able to get free and save you.

Outside, run to the horses while giving Abigail and Sadie cover from the mounted Pinkertons.

Once Sadie is mounted up, climb on behind her so you can cover your retreat.

Groups of Pinkertons on horseback will spawn on either side of you. Take them with Dead Eye to keep your accuracy high.

When you eventually reach safety, Arthur will dismount and bring Abigail up to date on what happened with John. He will then send Sadie with Abigail on her horse, leaving Arthur to follow Dutch on his. He has to tell Dutch what Milton told him before its too late.

Alone again, you will shift into a dreamlike cinematic mode as you ride, lost in memories of your life.

At the end of the sequence, you will be back at the remains of the camp on Roanoke Ridge. Arthur confronts Micah about his betrayal, telling Dutch what Agent Milton said.

Suddenly you are in an armed standoff, and the situation rapidly becomes complicated as suspicions and tensions rise.

Sides are chosen, and suddenly the line up from Red Dead Redemption appears.
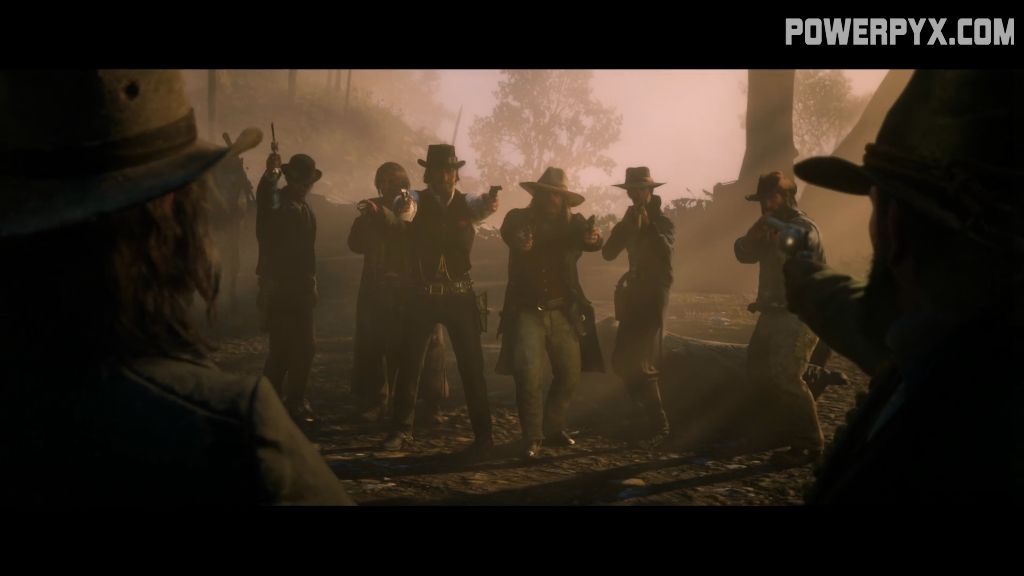
Before the standoff can be resolved, Pinkertons crash the party, forcing a temporary truce.

Continue to use Dead Eye to keep your accuracy high. This is a long mission, and every shot counts.

Micah and Dutch will abandon you while you involuntarily provide cover for their escape. As more Pinkertons arrive, John will suggest that you flee into the caves. As the numbers rapidly stack against you, its the only safe choice. Follow John to the escape route at the back.

Follow John up several ladders and ramps until you reach the surface.

Outside, you and John will whistle for your horses. Stay ahead of your pursuers by spurring your horse, following John closely through the woods. Pinkertons will appear around you, but just keep running.

At a roadblock, John will change direction and go down a side road. Keep up with him so you’re not caught in a pincer attack. Eventually you will be forced to fight on foot, with Pinkertons all around you on the ridge. Dead Eye works wonders here before they can find cover.

When they’re eliminated, you have a choice of helping John get to safety or returning for the money, which will give you increase or reduce your honor, respectively. Helping John is not only more thematically appropriate, but it represents the easier path, and is therefore recommended.

Follow John up the path to higher ground. You can ignore the shots below, that’s just Dutch’s group tangling with the Pinkertons, making a convenient diversion.

Partway up the path, John will indicate that you need to climb up to a series of cliffs. Gunfire will begin to streak past you at this point, encouraging you to follow John.

When John says to take cover, find a rock to hide behind and return fire at your pursuit.

Shoot at any targets you can see until John says that you need to get going. After this point a cinematic will play, setting up the final encounter. Arthur sends John ahead to be with his wife and child, while he will remain behind to cover his escape. When you have control again, get to cover and prepare for a lot of hostiles.

Pinkertons will be on a ridge across from you, and occasionally some will charge your position. Remember to keep your accuracy high. Any time you have Pinkertons at close range, immediately shift your focus to them and take them out with Dead Eye to limit the damage they can do to you.

After killing several Pinkertons, Micah will charge you from behind like the cowardly snake that he is, and wrestle you to the ground.

After tumbling off the side of the cliff, you will get to your feet and be in a fist fight with Micah. He will try to grapple you immediately. Break free and get your guard up.

You’re better off not attacking Micah directly, instead waiting until you block one of his punches, then punch back while he’s off balance. If you try to combo him however, you will likely miss and earn a sucker punch for your troubles. Just block and punch back once for safety.

When you’ve landed enough punches, Micah will start to strangle you against the wall. Continue to hammer / to fight for life.

It is very satisfying when you break free.

Continue to fight Micah using the same strategy as before. If Micah gets you on the ground, use  /
/  to block until you’re prompted to hit / to break free.

After you try to go for your gun, you will trade some vicious blows back and forth. Finally, Micah will taunt you while you crawl for your gun by hammering on  /
/  .
.

Unfortunately, it is not to be. Dutch interrupts your fight, leaving the issue unresolved. Watch the ending cinematic to complete the mission.

This finishes Red Dead Redemption main mission in Red Dead Redemption 2. Now the next quest The Wheel starts.
Next Up: The Wheel
For more Walkthroughs with all gold medals, check out the complete Red Dead Redemption 2 Story Walkthrough.
Master of game says
Micah is rat and enough
Doc-OP_X says
The ending always hits me so hard?