
There are 53 Activity Locations in Borderlands 4 (9 Order Silos, 14 Safehouses, 11 Ancient Crawlers, 7 Abandoned Auger Mines, 6 Order Bunkers, 6 Ripper Drill Sites). Completing all Activities unlocks the “Ruler of Everything” trophy & achievement.
None of the activities are missable. You can still do all of them after the story in free-roam. Some areas require story progress to become accessible, after the story you can reach all of them. Some activity types also require story progress and aren’t available from the start.
On the map they are indicated by “?” question marks. When you get close to them their icon type is revealed. When you are within their area, you get an objective in the top left corner that shows you what do you and you can press D-Pad Up (Z on PC) to have a line guide to the objective.
The best approach is to unlock the Order Silos and Safehouses while unfogging the map, these act as fast travel points. Then clean up the other activities after the story as they require defeating enemies and bosses which are a higher level.
This page lists all of them by area in the order they are closest together.
Activity Types & Pages by Type:
- 9 Order Silos – interact with the console to make a balloon fly out of a silo. It will mark the Vault Fragment collectible in that area.
- 14 Safehouses (Datapads & Console) – collect the datapad and use it on the console at the safehouse, unlocks fast travel, vending machines, contract board.
- 11 Ancient Crawlers – find a battery, insert it in the station, climb a tower to find an item.
- 7 Abandoned Auger Mines – go through the mine and beat the boss at the end. Unlocked after Main Mission 11: Shadow of the Mountain
- 6 Order Bunkers – go through the bunker and beat the boss at the end. Unlocked after Main Mission 5: One Fell Swoop
- 6 Ripper Drill Sites – defeat the waves of enemies and the boss that spawns at the end.
The Fadefields
Coastal Bonescape (4 Activities)
#1 – Safehouse: Abandoned Post
Automatically unlocked in Main Mission 2: Recruitment Drive as part of the story.

#2 – Abandoned Auger Mine: Timid Kyle’s Neglected Opening

#3 – Ancient Crawler: Slugmetal Ditch
Mark the icon on the map, then the location path guides you to the objective to release the clamps. Must pick up a small container (will have a blue marker), throw it at the console under the tower. Then climb to the top of the tower, pull out the piece of wall to reveal an item to collect.

#4 – Order Silo: The Stockroom
Simply interact with the console at the top of the enemy camp.

The Howl (3 Activities)
#5 – Order Silo: The Kit Hole
This is on top of a hill. Mark it and the location path will guide you to it. Must go up the side of the mountain and then over a wooden bridge.

#6 – Order Bunker: Blacklime Bunker

#7 – Safehouse: Shut-Eye Keep
To reach the safehouse use the elevator below it. To find the datapad, reach the last room of the safehouse where the vending machines are, at the vending machines turn around and scan (  ) for a grapple point on the wall. Jump up there to find the datapad, it will glow green. Then interact with the command console in the last room of the safehouse where the vending machines are.


Hungering Plain (2 Activities)
#8 – Ripper Drill Site: The Prospects
Defeat all waves of enemies and the boss “Sidney Pointylegs”.

#9 – Ancient Crawler: The Roaming Pasture
Pick up the power node in the southeast corner of the area (will have a blue marker). If you track the icon on the map it will guide you with the location path by pressing . You must carry the power node up the stairs on the big machine in the middle of the area. When you reach a ladder you must throw it up to the balcony (if you climb the ladder you will drop the power node). After throwing it up you can climb the ladder, then insert it in the console. Climb to the top of the tower and pull open the wall to pick up the reward.

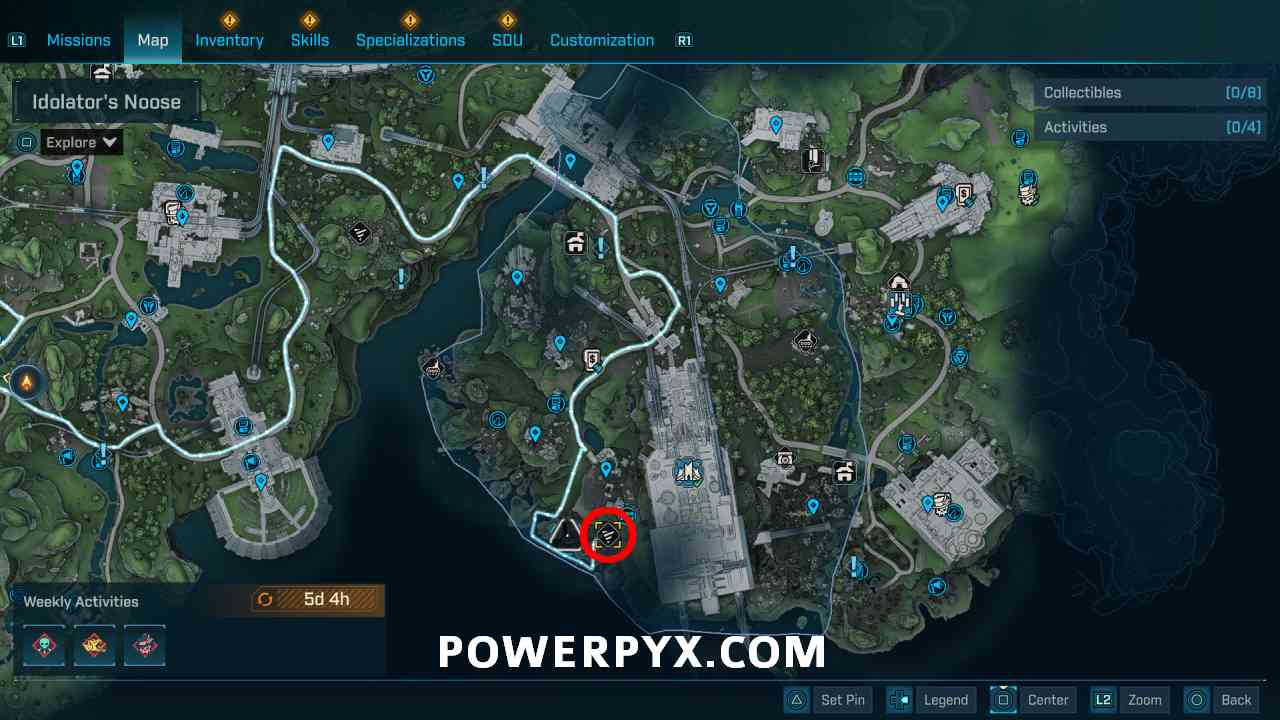
Idolator’s Noose (6 Activities)
#10 – Safehouse: Someday Rise
This is on top of a mountain, track the icon on the map to see the line guiding you to it. The Datapad is in the safehouse area at the end of the path where some mangler enemies spawn. As soon as you reach this area turn right to find the datapad on a bed under a hut. After picking it up, the door to the main building in the middle will open. Go inside and claim the console where the vending machines are.


#11 – Ancient Crawler: The Eminent Husk
Pick up the power core (will have blue marker), then toss it up to the main platform and jump up (can jump up the stairs with rocks sticking out). Place the power core in the console then climb to the top of the tower. Press to mark the climbable walls in green.

#12 – Ripper Drill Site: The Pitted Stain
Defeat all enemies and the 3 bosses: Frank the Furnace, Sal the Engineer, Hank the Welder. These are high level bosses (was Level 34 for me). If they show red skull icons you should come back later after leveling up.
#13 – Order Bunker: Tipping Point

#14 – Safehouse: Wyclef’s Reprieve
Go through the safehouse and onto the balcony behind it. You must drop down the balcony where the floor is destroyed and you see sparks coming out. It’s a long fall to the area below (south of the safehouse icon on the map). There you find the datapad, it will be marked blue when near it. Now backtrack up to the safehouse and insert it in the console where the vending machines are.


#15 – Ancient Crawler: Pester’s Grotto

Dissected Plateau (2 Activities)
#16 – Abandoned Auger Mine: The Claim

#17 – Order Silo: Deep Seven

Carcadia Burn
Lopside (3 Activities)
#18 – Ancient Crawler: The Belle

#19 – Safehouse: Makeshift Chalet
Drop down the cliffs behind the safehouse to find the datapad. The console is in the plaza where all the enemies are, not in the building where the safehouse icon is. From where you entered the plaza it’s on the left (west). Look on the HUD where the vending machine icons appear, that’s the building where you find the console. Tracking this location on the map gives a confusing location line, so ignore that.


#20 – Ripper Drill Site: Tendercage

Grindstone of the Worthy (3 Activities)
#21 – Abandoned Auger Mine: Embossed Fault

#22 – Order Silo: Rustical Hurl

#23 – Order Bunker: The Crawlcroft

Tonnage Peel (3 Activities)
#24 – Ancient Crawler: Crumpled Lurch

#25 – Safehouse: The Lowrise
You must approach this safehouse from the upper level of the area, from the road to the west of the safehouse. Don’t approach it from the lower level to the east. You can mark it on the map and drive along the location line, it’s a long way around the area. Then on the upper level you will see a grapple point where you can pull yourself up. Jump over the platforms (don’t fall down) and go to the top. The datapad is on a platform at the top, to the back left of the safehouse (north corner). The console is also at the top near the datapad, on the front side of the safehouse, outside the safehouse, slightly south-west of the vending machines.


#26 – Order Silo: Site Unseen

Ruined Sumplands (5 Activities)
#27 – Ancient Crawler: Wanton Tread

#28 – Abandoned Auger Mine: Trinket Crevass

#29 – Order Silo: Judgement’s Lapse

#30 – Ripper Drill Site: Saw’s Clench

#31 – Safehouse: Wildhorn’s Beard
The datapad is on top of the mountain slightly south of the safehouse icon, in a small boat. When you mark the safehouse the location line leads you there. The console is slightly north of the safehouse icon, inside the ruins, where the vending machines appear on the HUD.


Fallen Crown (0 Activities)
No Activities in this area.
Terminus Range
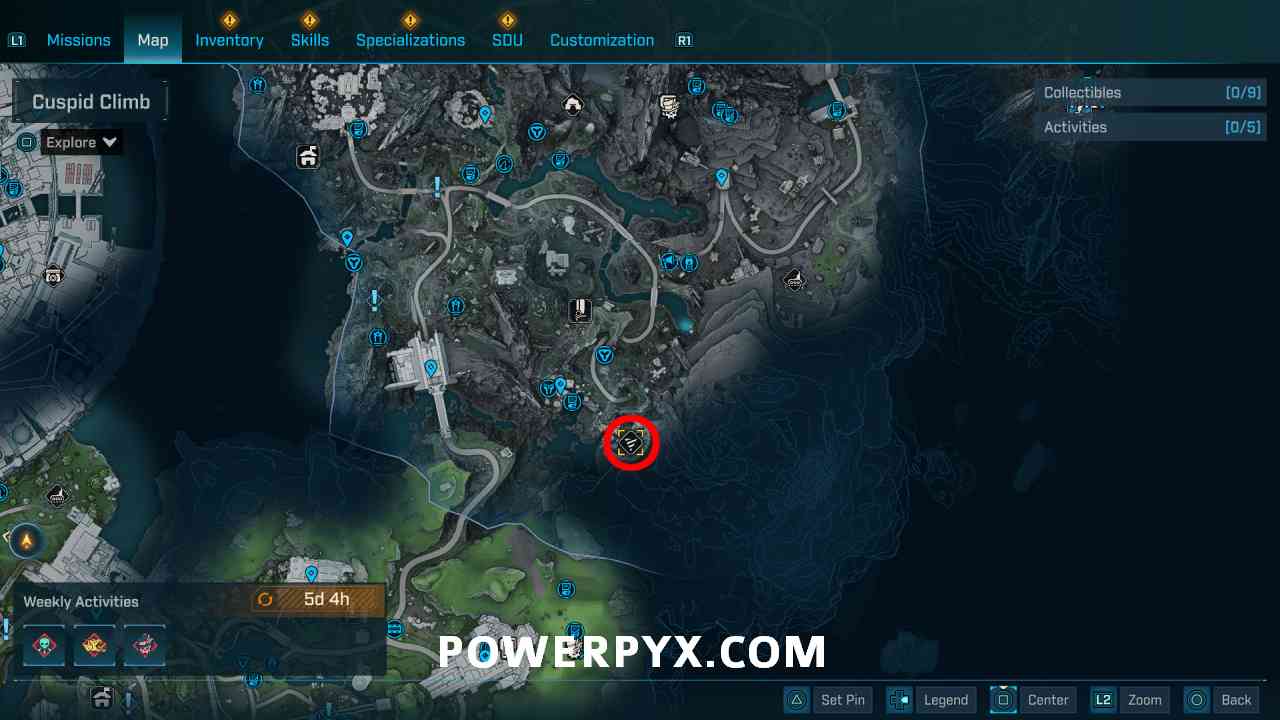
Cuspid Climb (8 Activities)
#32 – Ripper Drill Site: The Old Scrape
#33 – Order Silo: The Reliquary

#34 – Safehouse: Grey Havenage
Approach the safehouse from the south. The safehouse will be locked. There are two towers in front of the safehouse. When facing the safehouse look left (west) and climb up that tower by using the grappling point. Scan with to see climbing points and walls in green. From there you must glide over to the second tower, on top of it you find the datapad. This opens the door on the rooftop of the safehouse. From the second tower glide over to the safehouse roof, go through the door, drop down into the room with the vending machines. The console is in the same room as the vending machines.


#35 – Abandoned Auger Mine: Whistler’s Maw

#36 – Ancient Crawler: The Stonewarden

#37 – Ancient Crawler: The Great Work

#38 – Safehouse: Heritage Opus
Mark the safehouse location on the map and the location line will guide you there. The datapad is to the immediate right of the safehouse door on a little roof (south-west of safehouse door). Jump to it from the containers or the other small roof. This will open up the safehouse door. Go inside to find the console in the same room as the vending machines.


#39 – Order Silo: Covered Charge

Heart of the Mountain (1 Activities)
#40 – Order Bunker: Craven’s Nook

The Low Leys (4 Activities)
#41 – Order Bunker: The Wireworks

#42 – Ancient Crawler: Eureka Stane

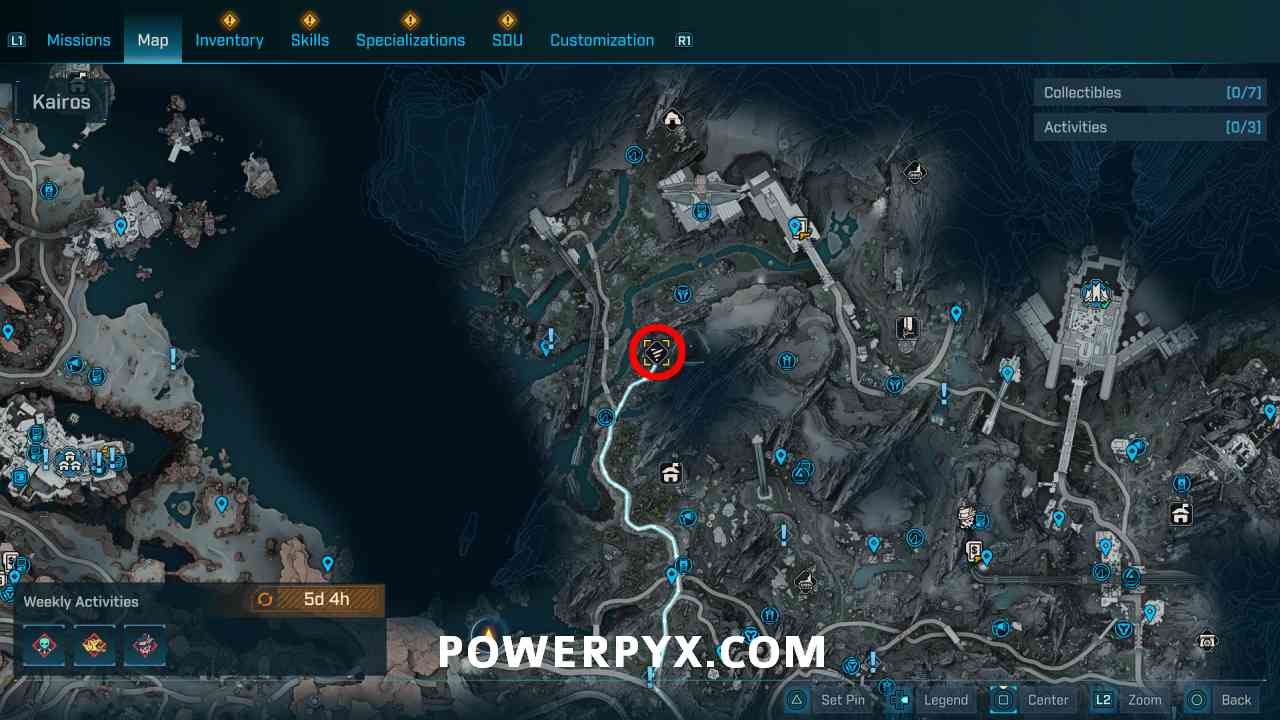
#43 – Order Silo: Deathright
This silo can be a bit confusing. The in-game map icon is at the wrong location, pointing to the silo that releases the balloon, rather than the console you must activate. Marking the map icon will lead to the wrong spot. The console is actually on the mountain to the north of where the map icon is. From the silo icon, go around the mountainside to the west until you reach a climbable wall. Climb up and jump over the cliffs to the console at the end of the mountain. The second image below outlines the correct path in red, with the yellow character arrow being the starting point and the red circle being the endpoint where you activate the console.


#44 – Ancient Crawler: Forgotten Cornerstone

Windspear (1 Activities)
#45 – Safehouse: The Nightcap
This safehouse is in a little cave. You find the entrance slightly north of the safehouse icon on the map. Inside the cave, climb up the wall on the left (scan with to mark it green). While on the wall, turn around and glide over to another platform, the datapad is there. Pick it up to open the door to the safehouse at the end of the cave. The console is in the same room as the vending machines, at the end of the safehouse.


Stoneblood Forest (3 Activities)
#46 – Safehouse: Snowy Wells
This safehouse is on top of a mountain. To reach the datapad you must climb onto the roof of the safehouse. Then use the grappling hooks to jump over the cliffs. Then you reach the datapad on a broken bridge to the east of the safehouse. Glide back to the safehouse. The console can be found on the southwest corner behind the safehouse, on the outside.


#47 – Ripper Drill Site: The Lowering March
#48 – Abandoned Auger Mine: Bittervein

Dominion
Dominion City is reached during Main Mission 17: The Falling Wall.
Carcadia District (2 Activities)
#49 – Safehouse: The Lockaway
Automatically unlocked during Main Mission 17: The Falling Wall as part of the story.

#50 – Abandoned Auger Mine: The Toil of Spoiling Vis
This one is a bit tricky to locate as there’s no navigation line available for it. The entrance is found through an open doorway 200 meters south-east of the activity icon on the map. Slightly south-west of the safehouse. Go around the edge of the walls until you see an open doorway in one of the walls.


Terminus District (2 Activities)
#51 – Safehouse: The Food Court
The datapad is almost exactly where the safehouse icon is. Very slightly north of the vending machines on a garbage pile. The console is in the middle of the courtyard between all the vending machines.


#52 – Order Bunker: Ironwall Resolve

Fades District (1 Activities)
#53 – Safehouse: Sumpview Falls
The datapad is found on the little balcony directly above the locked safehouse door where you can see the vending machine icons on the HUD. The console is to the left of the locked door in the area where some enemies spawn.


For all other collectibles refer to Borderlands 4 Collectible Guide.
Leave a Reply