
You Know My Name is the 7th main story mission in Cyberpunk 2077: Phantom Liberty DLC. This walkthrough will guide you through all objectives, paths, dialogues, choices and endings of the You Know My Name Job.
Starting Area: Dogtown
Quest Giver: Reed
Requirement: Complete ‘Get It Together’
Reward: None
Mission Info: Nothing’s impossible, huh? Not only you managed to get Mr. Hands to help you, but even got old Solomon Reed to confide in you. You’re on a hot streak, V – it seems that even breaking into the best-guarded fortress in Dogtown (maybe even all of Night City) is actually possible. And if you do manage to get Songbird out of there, you should consider buying a bunch of scratch tickets, ’cause Lady Luck is clearly on your side.
Objectives:
- Enter the flooded tunnels.
- Put the diving suit on before diving.
- Proceed down the tunnels.
- Use the panel to open the path.
- Proceed down the tunnels.
- Defeat the warehouse guards.
- Connect to the CCTV through the security computer.
- Switch between cameras to track Reed.
- Open the entry gate.
- Take the elevator to the maintenance area.
- Ride the elevator.
- Go to the meeting point.
- Neutralize the sniper.
- Jack In.
- Track down Reed.
- Talk to Reed.
- [Optional] Scan the floor for potential threats.
- Use Kiroshi to find the meeting point.
- Talk to Reed.
- Identify immediate threats to Reed.
- Find a way to open the passage for Reed.
- Destroy the power source for gate security systems.
- Identify immediate threats to Reed.
- Find the progress route for Reed.
- Take out the guard.
- Identify immediate threats to Reed.
- Handle the sniper on the balcony.
- Identify immediate threats to Reed.
- Handle the guard blocking Reed’s progress.
- [Optional] Use the CCTV system to locate the guard blocking Reed’s progress.
- Handle the guard blocking Reed’s progress.
- Identify immediate threats to Reed.
- Deal with the incoming guards.
- Wait for Reed to pass through.
- Join Reed.
- Take the elevator to the top floor.
- Ride the elevator.
- Follow Reed.
- Grab your outfit.
- Put on your eveningwear.
- Go to the party.
- Join Reed at the bar once you’re ready.
- Talk to Reed.
- Enjoy the party until Songbird makes contact.
- Read the message from Songbird.
- Approach Songbird.
- Talk to Songbird.
- Take the shard from the glass.
- Join Reed at the bar.
- Buy at least €$80,000 worth of casino chips for roulette.
- Play roulette with the netrunners.
- [Optional] Scan Aurore.
- Scan Aymeric.
- Get through the confrontation with Hansen.
- Talk to Alex.
- [Optional] Cash out your winnings.
- Leave the Black Sapphire through the lobby.
- Talk to the guards.
- Follow the guard to the exit.
- Follow Reed.
- Talk to Reed.
Starting Location: Pacifica – Dogtown
This mission automatically starts in the safehouse at the end of ‘Get It Together’.
Enter the flooded tunnels
Head to the flooded tunnels on the map:

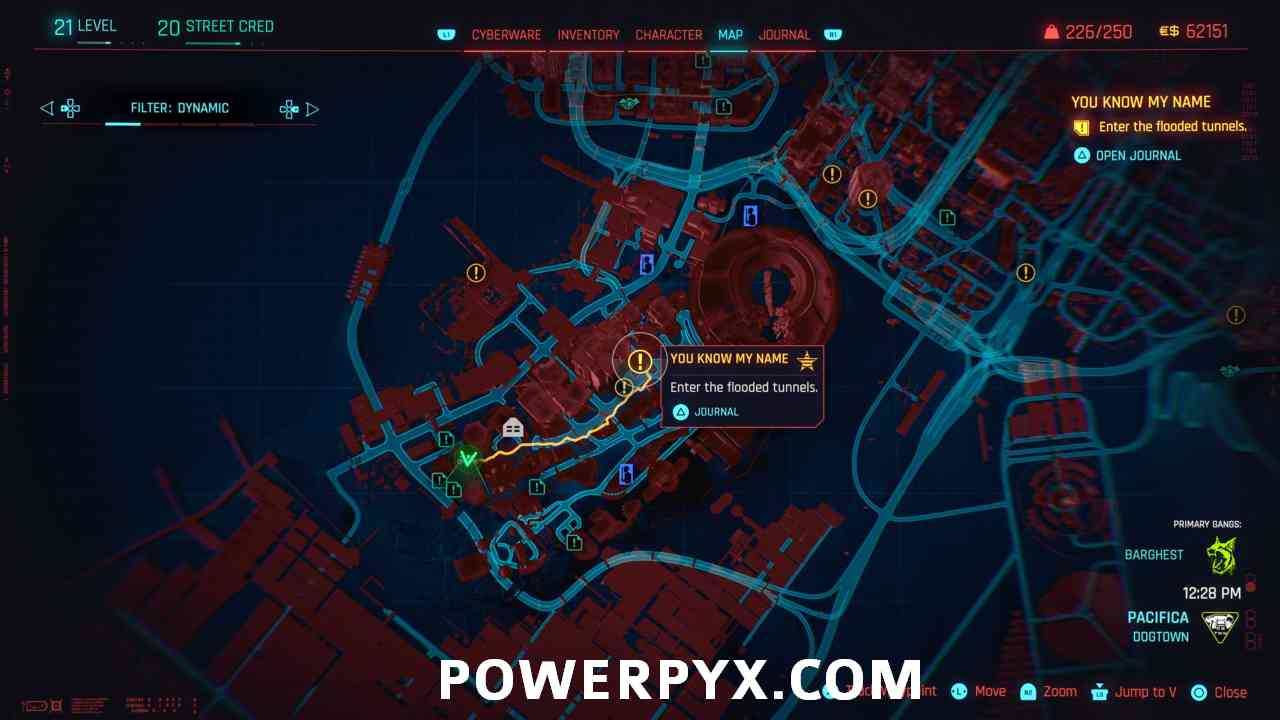
Head to the lower level and follow the quest marker to a door that Johnny where Johnny will meet you.
Force the door ahead open. Go through the tunnels and through the subsequent door ahead.
Put the diving suit on before diving
Equip the diving suit in your Inventory in the Outfit section:

Proceed down the tunnels
Once the diving suit is on hop in the water. Swim down the tunnels until you get to the Sewer Grate. Once you get to the Sewer Grate use the action button to open it. Swim through the tunnel ahead avoiding the bombs on the walls. Once you get to the red van open the door using the action button. Continue following the linear path and out of the water. Continue ahead and dive back under the water.
Continue down the path watching out for another bomb until you get to the garage door. Use the action button to open the door up. Locate the little cubby with the ladder in it. Use the action button to lower the ladder and climb up.
Use the panel to open the path
Head over to the panel sparking at the end of the path and use the action button on it. Hop back into the water and onto the platform you lowered. Jump up to the panel ahead and lower the platform next to the first one.
Proceed down the tunnels
Head onto the newly lowered platform and into the vent ahead. Exit the vents at the end and use the ladder across the way to climb your way up. Head around the bend at the top and locate the other ladder that is on the opposite side of the platform. Jump to this ladder and climb up.
Defeat the warehouse guards
Once at the top you will enter a hostile area. There are two guards in this room. Defeat them both to proceed.
Connect to the CCTV through the security computer
Drop down below and head across the bottom and up the stairs. At the top of the stairs locate the computer and ‘Jack in’ to it.
Switch between cameras to track Reed
Press right on the D-Pad 3 times to find Reed. Locate the gate on the screen and use the action button to open it for Reed.
Open the entry gate
You will need to complete a Code Matrix to open the door.
Take the elevator to the maintenance area
Once the door is open you will automatically leave the computer. The elevator will make its way down to where you are with guards on board. Take out the few guards and get on the elevator they took down. Use the controller to take you to 67: Maintenance Area.
Ride the elevator
During the elevator ride you will have a talk with Reed, there are no dialogue options here.
Go to the meeting point
Head forward and up the stairs ahead.
Neutralize the sniper
At the top you will see a sniper straight ahead. Crawl up to the sniper from behind and use the action button to ‘Incapacitate and jack in’.
Jack In
You will automatically jack in while Reed rides the elevator up to the platform on the other side.
Track down Reed
Zoom in and locate Reed on the other side of the opening. Follow Reed forward while zoomed in and let him know you see him.
Talk to Reed
Reed will discuss that he wants this done quietly if possible.
[Optional] Scan the floor for potential threats
Just ahead of where Reed is you will see a laser mine. While zoomed in on the sniper use the scan button to scan the mine on the wall and warn Reed of it. Follow the path forward scanning until you get to the guards down the stairs. Scan them and warn Reed of their presence. Zoom out and look to the right of the first set of guards resting point to see a camera on a pillar. Scan that and warn Reed of the cameras.
Use Kiroshi to find the meeting point
Look all the way to the left and you will see a container with a ‘Kurt 4 Prez’ banner on it. Scan it until you have the dialogue available to ask Reed if he sees the bridge.
Talk to Reed
Use the bridge to activate a dialogue between you and Reed where he informs you that you will need to cover him. After the dialogue the sniper’s firing mode will be active.
Once firing is active let Reed know to ‘Go’ with the action button.
Identify immediate threats to Reed
Follow Reed walking forward. Once he disarms the bomb he will ask if it’s safe to move forward. Look ahead on the path and inform Reed that there is a patrol coming.
Find a way to open the passage for Reed
Scan the door ahead of Reed and follow the cables coming out of the top of the door and continue scanning each bit of cables to reveal more. Keep following that to the power supply above.
Destroy the power source for gate security systems
Once you have located the power supply shoot it.
Identify immediate threats to Reed
Reed will continue forward and let you know that you need to help him take out the guards.
Find the progress route for Reed
Take aim at the guard on the left and let Reed know when you are ready using the action button.
Take out the guard
When Reed tells you he is ready shoot the guard.
Identify immediate threats to Reed
As Reed moves toward the elevator look ahead at the elevator to warn him about the patrol headed his way.
Handle the sniper on the balcony
Reed will tell you he thinks he saw a sniper that spotted him. He will highlight red. Take the sniper out with a headshot.
Identify immediate threats to Reed
Follow Reed walking forward until he heads down the stairs on the other side of the elevator area.
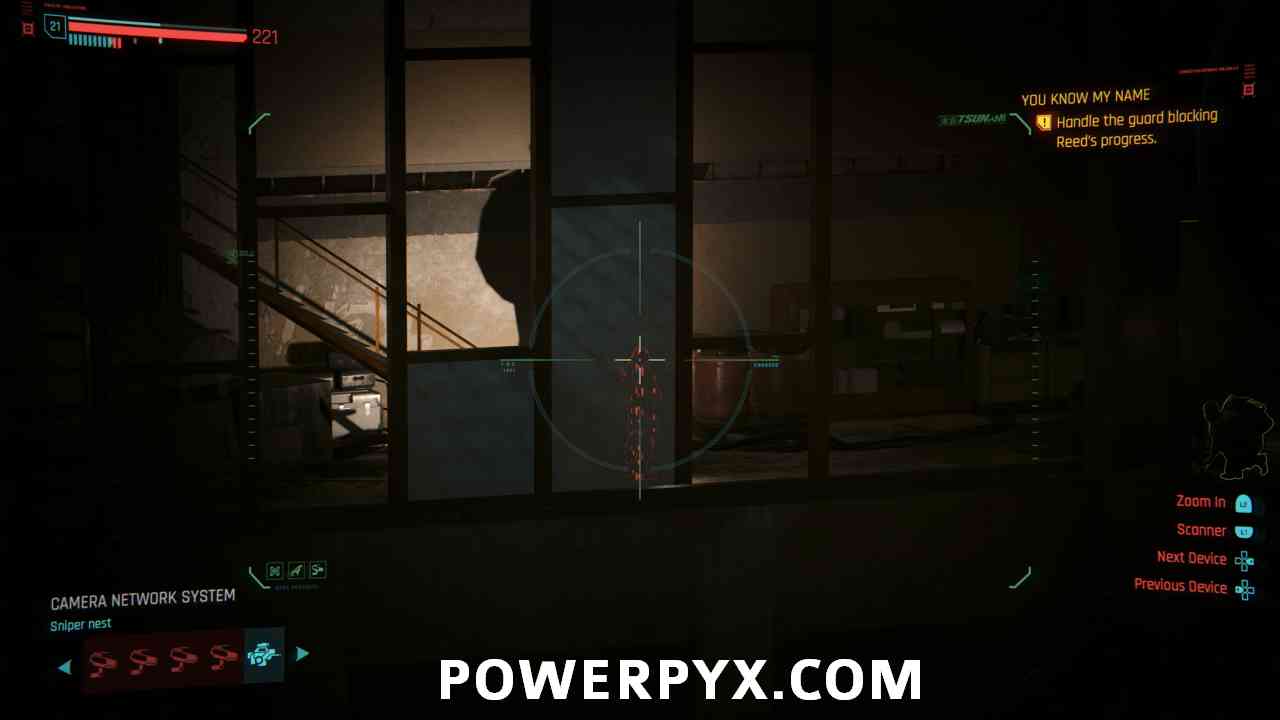
Handle the guard blocking Reed’s progress
Reed informs you that he needs you to hack into the CCTV camera above his head to see the guard who is in his path.
[Optional] Use the CCTV system to locate the guard blocking Reed’s progress
Scan the camera and select ‘Camera Control’:

Handle the guard blocking Reed’s progress
Once inside the camera you will see the guard. Scan the guard and choose ping:

Once pinged return to the sniper view and take out the guard using its red silhouette:
Identify immediate threats to Reed
Once Reed heads upstairs you will need to look farther down the path and you will see another incoming patrol and warn Reed.
Deal with the incoming guards
Take out both of the guards by shooting them one after the other before they can realize what happened.
Wait for Reed to pass through
While Reed is passing through the last corridor you will be unlocking the sniper from its base.
Join Reed
Head forward through the newly opened door and over the bridge Reed lowers for you.
Take the elevator to the top floor
Follow Reed to the elevator and select 99: Laundry Room on the keypad.
Ride the elevator
On the way up you will have a dialogue with Reed:
- Havin’ a little déjà vu. > both options have same outcome
- Not looking so hot either, Reed.
- I’m fine. > Adds an extra dialogue
- [If ‘I’m fine’ is chosen] I’m fine. Really. > both options have same outcome
- [If ‘I’m fine’ is chosen] Just remembered something.
- Howe many missions you got under your belt? > both options have same outcome
- Seen my share of action, too.
You can skip this dialogue altogether by just not answering by the time the elevator reaches the top.
Follow Reed
Follow Reed forward off the elevator and into the next room.
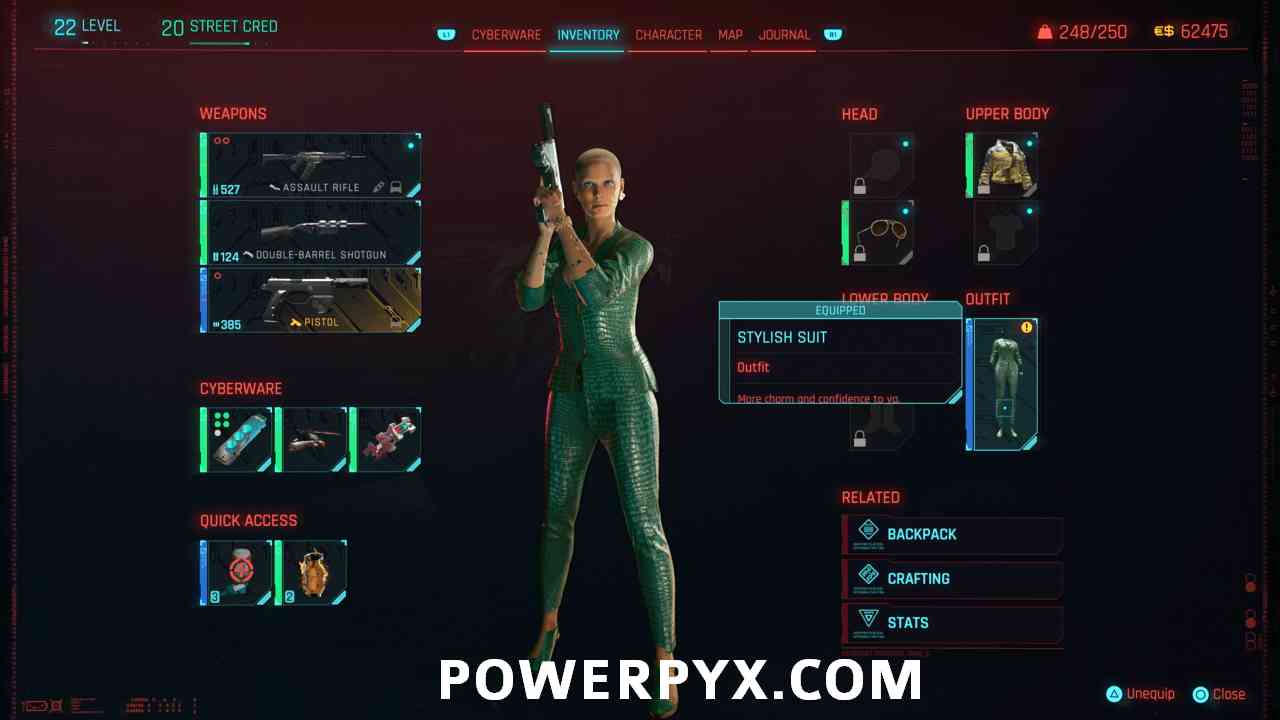
Grab your outfit
Look in the bag Reed was carrying and take your outfit, the Stylish Suit.
Put on your eveningwear
Head back into your inventory and change your outfit from the wetsuit to the Stylish Suit:
Go to the party
Head out the door ahead and follow Reed forward to the party.
Join Reed at the bar once you’re ready
Head over to Reed as there isn’t much to do here, he is leaning up against the bar.
Talk to Reed
Start speaking to Reed:
- You’re the one with the plan.
- Let’s party…?
- I’ll look for Songbird.
Enjoy the party until Songbird makes contact
Walk around the area and have a couple of drinks from the ladies holding drinks or from the two smaller bars until you get a text from Songbird.
Read the message from Songbird
Open the text to reveal Songbird’s location.
Approach Songbird
Head upstairs to where Songbird is.
Talk to Songbird
Approach Songbird and Confront her to start a dialogue:
- [Lean] Lookin’ good in that dress. > all options have same outcome
- [Lean] You’re chromed out, different from the hologram.
- [Lean] Don’t exactly look like a prisoner.
- Didn’t really give me a choice. > both options have same outcome
- You can count on my help.
- You didn’t Blackwall did. > all options have same outcome
- Could say we both did…
- Yep, zeroed him hard.
- Reed’s fault, really.
- [Timed] Listen, time’s precious. > missing timing does nothing
- Plan – you got one. > both options have same outcome
- Didn’t mention you were dyin’.
- [Timed] [Shake hand] V. > both options have same outcome
- [Timed] [Don’t shake hand] V. So Mi’s friend.
- [Stop leaning] The hell’s goin’ on here? > both options have same outcome
- [Stop leaning] Feels like you tricked me, Song.
- Your plan – lemme hear it.
- Don’t like this, not one bit. > Becomes optional if you choose ‘Feels like you tricked me, Song.’
- Matrix – we recover it how? > both options have same outcome
- No, wait, slow down.
- Neural matrix – what is it, exactly?
- We can do that. > both options have same outcome
- Keepin’ somethin’ from me, I can tell.
- ‘Runners – how we gonna impersonate ’em?
Take the shard from the glass
Grab the shard from out of the glass on the table you were leaning on.
Join Reed at the bar
Head over to where Reed is down the hallway. Walk over to him and sit to let him know you spoke to Songbird:
- Hansen. > all options have same outcome
- Songbird.
- Who’d that be?
- [Timed] Lean > missing timing does nothing
- Put it together in a flash. > both options have same outcome
- Not too early for conclusions?
- High treason, no matter how you cut it.. > both options have same outcome
- Dunno. Song contacted me with a view to rescuing Myers…
- Making some serious accusations here…
- Gotta believe Song’ll keep her word. > all options have same outcome
- Shit, get the impression Song’s playin’ me…
- Sheesh. Not sure what to believe.
- So, gonna rescue a traitor? > both options have same outcome
- How you feelin’ about this?
- Need to be careful. > all options have same outcome
- Agreed.
- Not sure I get you, Reed.
- Here to get my due, what I was promised.
- [Give shard] Our target – redheaded twins.
- Personality kleppin’ – what’s that about?
- Seems they’re playing roulette.
- Traced them in no time.
- [Stand] Let’s get to it.
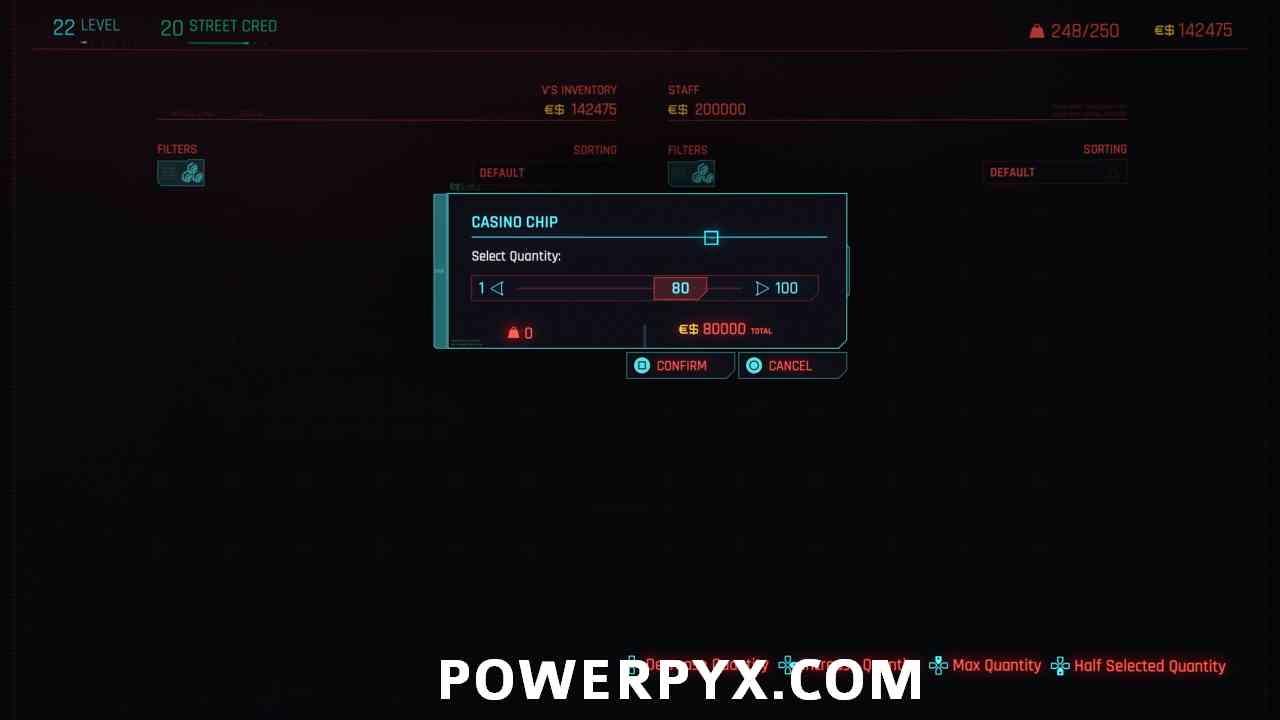
Buy at least €$80,000 worth of casino chips for roulette
Head to the Cashier at the marker and approach her in the window and exchange money for chips.
Select the 100 chips option in the shop tab and scroll to 80:
Play roulette with the netrunners
Head to the roulette table past Reed. If there is a game already going you will need to wait for the current round to be over. Once its over you will have the option to place a bet on red or black.
While the ball is rolling order some drinks for the lady and one for yourself:
- [Order Drinks] What’s your poison?
- How’s it going?
- Same as the lady. > all options have same outcome
- Same as the gentleman,
- Whiskey.
- Gin ‘n’ tonic.
- [Timed] Bet on red > result is random, no impact on dialogue
- [Timed] Bet on black
- Tourist – that’s me. > all options have same outcome
- Conscience ain’t spotless, that’s sure.
- Guess.
- [Timed] [Bet on red] Seems I interrupted something just now. > both options have same outcome
- [Timed] [Bet on black] Didn’t mean to break your flow.
- [Timed] [Bet on red] Didn’t mean to be rude, certainly. > both options have same outcome
- [Timed] [Bet on black] You’re unique, stick out from the crowd.
- Drink. > optional
[Optional] Scan Aurore
Simply scan Aurore to complete this objective.
Scan Aymeric
Scan Aymeric for intel on both Aymec and Aurore and then resume the conversation:
- [Timed] Bet on red > result is random, no impact on dialogue
- [Timed] Bet on black
- Psychoanalysis – hobby of yours? > all options have same outcome but the last
- Man’s a career criminal.
- Ain’t no upstanding citizen, that’s sure.
- Businessman, through and through.
- Dumb question, dumb answer. > Only appears if you selected ‘Businessman, through and through.’ > both options have same outcome
- How ’bout you tell us what’s bouncin’ ’round your noggin?
- [Timed] Bet on red > result is random, no impact on dialogue
- [Timed] Bet on black
- [Timed] Audacity your callin’ card? > both options have same outcome
- [Timed] Charmin’ little show.
- [Timed] Bet on red > result is random, no impact on dialogue
- [Timed] Bet on black
- Sister’s right. > all options have same outcome
- Makes sense for him to retire, not go legit.
- Naive and shortsighted, your approach.
- Owning Dogtown’s one helluva bargaining tool.
- [Timed] [Bet on red] Can tell you got somethin’ on the tip of your tongue. > both options have same outcome
- [Timed] [Bet on black] Guesssin’ you got no respect for upright, honest peeps.
- All or nothin’ – whaddaya say?
- Have a taste for risk?
- [Timed] V, merc from the afterlife. > all options have same outcome
- [Timed] I’m a thief.
- [Timed] None of your biz.
- [Timed] FIA agent.
- [Timed] Red > both options have same outcome
- [Timed] Black
Get through the confrontation with Hansen
Next Hansen will cut in for some dialogue:
- Cracked the case. Smart man. > both options have same outcome
- You won’t send us back in body bags.
- Don’t scare that easily.
- Brave face you’re puttin’ on… > both options have same outcome
- Always willin’ to help.
- What else you got to say?
- [Walk away] Now what? > both options have same outcome
- [Walk away] Hear what he said?
Talk to Alex
Alex will automatically have a dialogue with no options after the confrontation.
[Optional] Cash out your winnings
Head back to the cashier and cash out your winnings to get your money back plus.
Leave the Black Sapphire through the lobby
Once you are cashed out head back through the party following the path on the mini-map. On the elevator ride down you will get a dialogue with Alex through a phone call:
- NUSA’s in trouble. > Will have to select both
- Songbird is Hansen’s bargaining chip.
Talk to the guards
Once the elevator reaches the bottom you will be confronted by some guards:
- All right, I’m goin’ > both options have same outcome
- Can’t order me around.
- Reed!
Follow the guard to the exit
Simply follow Reed and the guard out, don’t shoot anyone.
Follow Reed
Once outside continue to follow Reed.
Talk to Reed
Once you and Reed stop you will have a dialogue with him:
- Hansen came by, threatened me.
- We were worried…
Once the dialogue concludes the 7th main job in the Cyberpunk 2077 Phantom Liberty DLC.
Next: Birds With Broken Wings
For all other Quest Walkthroughs, check out the complete Cyberpunk 2077 Walkthrough.
Arno. Nym says
Alex mentioned a reward in the call afterwards… Where is it and what is it? Apartment China town? Which is it?
takemurahottestdilf says
It’s a Lizzy Wizzy performance recording (BD) you have to go back to your initial apartment in watson – little china.